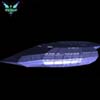
And this is the lightmap.
Moderators: another_commander, winston


Code: Select all
<key>materials</key>
<dict>
    <key>ahruman_illuminated_box.png</key>
    <dict>
        <key>diffuse_map</key>
        <string>ahruman_illuminated_box.png</string>
        <key>illumination_map</key>
        <string>ahruman_illuminated_box_light.png</string>
    </dict>
</dict>This is actually more complex than what you want. It looks here as if you’ve mixed a light layer with the base texture using multiply mode, which (if it was in colour) would effectively produce an emission map that’s equivalent to the illumination map you really want.pagroove wrote:
And this is the lightmap.

Shininess can indeed be done using specular_map, but it’s a lot more abstract. Let’s start with the simple stuff. :-)ADCK wrote:But the guide that Ahruman gave seems better for just hull lighting, and I think shinyness can be done with materials too, but don't know about engine glows that change depending on engine speed, i think that can only be done with shaders, but in my opinion theyre not really important, anyway as the exhaust flames usually cover the area anyway :P


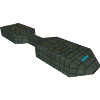
You just need the shape the light casts - not how it illuminates the texture as well - so what did you light look like before you multiplied it with the greyscale texture map?pagroove wrote:Yes, The above image is the texture and then applied the mode Greyscale in Photoshop.
So it's not so easy. I find it bloody complicated
EDIT:
Your picture in the example looks easy but it's not easy to separate a colored image lightmap only. I thought that choosing the grayscale mode and then turning down the brightness would a sort of illumination map.
Oolite Life is now revealed hereSelezen wrote:Apparently I was having a DaddyHoggy moment.
Oolite Life is now revealed hereSelezen wrote:Apparently I was having a DaddyHoggy moment.
Well, the way i would do it is a bit complicated, step by step: (with GIMP)pagroove wrote:Yes, The above image is the texture and then applied the mode Greyscale in Photoshop.
So it's not so easy. I find it bloody complicated
EDIT:
Your picture in the example looks easy but it's not easy to separate a colored image lightmap only. I thought that choosing the grayscale mode and then turning down the brightness would a sort of illumination map.


No it's a flattened image.Ahruman wrote:But surely you have the textures in layers in Photoshop? You’ve used the same lighting scheme with different colours, after all.
Oolite Life is now revealed hereSelezen wrote:Apparently I was having a DaddyHoggy moment.
That I did with layers. But I flatten the image when Im content with it. I know it's probably not the right way of working but. I'm used to work in that way.DaddyHoggy wrote:OK, but how did you make those lovely light cones? You need your lovely texture before you added the light effect and then the light effect as a separate greyscale texture - You do keep all these effects separate don't you, before combining them at the end?