Oolite 2: materials
Posted: Sat Apr 30, 2011 9:37 pm
So, as you may have noticed, the two-week schedule on 1.75 betas has slipped a bit. This is entirely my fault. My current plan is to release 1.75.2 next weekend, regardless of how many more bugs are fixed before then.
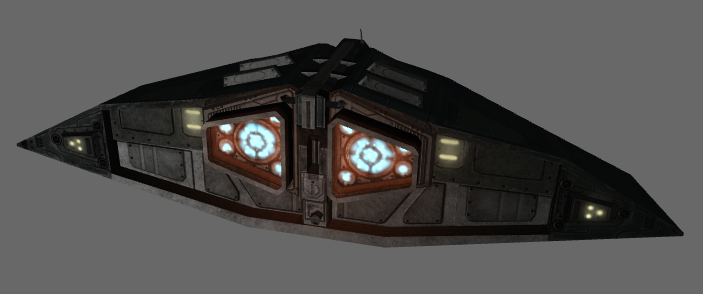
But fear not! I haven’t wasted my time on any of that boring having-a-life stuff. Instead, I’ve been hacking on Oolite 2. A lot of it is dull back-end stuff, but for the last few days I’ve been working on the material system for the new graphics engine, so I now have some pretty pictures to show. Well, slightly pretty.

This is an Oolite 2 Cobra Mark 3 in Dry Dock 2, the test bed for the new engine (cleverly named OoliteGraphics). If it seems less impressive than Oolite 1, you’re right: it currently only handles diffuse lighting and emission maps. However, it does it in a much smarter way.
In Oolite 1, materials without custom shaders are rendered using the default shader, which is 341 lines of very messy GLSL. To control the various features, Oolite writes a bunch of macro definitions in front of the shader. This is not only ugly, it’s also inflexible. For example, there are exactly two ways textures can be combined:
In the new regime, the game will instead write a shader which implements only the features specified in a material. When it does, any particular texture-mapped value can be specified as any combination of channels from a texture, and if a texture is used for more than one map it will only be read once. For example, the material specification for the Cobra is:
Note that the
Here is the output of the shader generator. Most of the actual shader code is temporary, but it demonstrates the idea:
Note the line
As a more concrete example, here’s what happens if you change the
In the shader, the line
The extra flexibility also means it would be quite easy to support multiple emission maps, each with their own colours. Intensity could be bound to anything that can be used in a uniform binding. For example, engine glows could be implemented this way, without treating them as a special case.
Another thing to note is the “attributes” section at the top of the vertex shader. Attributes are per-vertex values. In Oolite 1.x, custom shaders can only use the predefined attributes
But fear not! I haven’t wasted my time on any of that boring having-a-life stuff. Instead, I’ve been hacking on Oolite 2. A lot of it is dull back-end stuff, but for the last few days I’ve been working on the material system for the new graphics engine, so I now have some pretty pictures to show. Well, slightly pretty.
This is an Oolite 2 Cobra Mark 3 in Dry Dock 2, the test bed for the new engine (cleverly named OoliteGraphics). If it seems less impressive than Oolite 1, you’re right: it currently only handles diffuse lighting and emission maps. However, it does it in a much smarter way.
In Oolite 1, materials without custom shaders are rendered using the default shader, which is 341 lines of very messy GLSL. To control the various features, Oolite writes a bunch of macro definitions in front of the shader. This is not only ugly, it’s also inflexible. For example, there are exactly two ways textures can be combined:
normal_and_parallax_map and emission_and_illumination_map. If you want to combine a normal map and an emission map into one texture, well, you have to write your own shader.In the new regime, the game will instead write a shader which implements only the features specified in a material. When it does, any particular texture-mapped value can be specified as any combination of channels from a texture, and if a texture is used for more than one map it will only be read once. For example, the material specification for the Cobra is:
Code: Select all
materials:
{
    main:
    {
        diffuseMap: "griff_cobra_mk3_mainhull_diffuse_spec.png",
        normalMap: "griff_cobra_mk3_mainhull_normal.png",
        specularExponent: 5,
        specularColor: [0.2, 0.2, 0.2],
        emissionMap: { name: "griff_cobra_mk3_mainhull_normal.png", extract: "a" },
        emissionColor: [0.99, 0.97, 0.73]
    }
}emissionMap uses the same texture as the normalMap. This particular case, extracting only one channel, is possible in Oolite 1, but it will actually result in a second, greyscale texture being created. In Oolite 2, extract can take one to four channels, as in rgb, br or rrra – exactly like swizzle operations in GLSL.Here is the output of the shader generator. Most of the actual shader code is temporary, but it demonstrates the idea:
Code: Select all
// Vertex shader:
// Attributes
attribute vec3      aPosition;
attribute vec2      aTexCoords;
attribute vec3      aNormal;


// Varyings
varying vec2        vTexCoords;
varying vec3        vNormal;
varying vec3        vLightVector;
varying vec4        vPosition;


void main(void)
{
    vec4 position = gl_ModelViewProjectionMatrix * vec4(aPosition, 1.0);
    gl_Position = position;

    vTexCoords = aTexCoords;
    vPosition = position;
    vNormal = normalize(gl_NormalMatrix * aNormal);
    vLightVector = gl_LightSource[0].position.xyz;
}

// Fragment shader:
// Uniforms
uniform sampler2D   uTexture0;
uniform sampler2D   uTexture1;


// Varyings
varying vec2        vTexCoords;
varying vec3        vNormal;
varying vec3        vLightVector;
varying vec4        vPosition;


void main(void)
{
    vec4 totalColor = vec4(0.0);

    // Texture reads
    vec2 texCoords = vTexCoords;
    vec4 tex0Sample = texture2D(uTexture0, texCoords);  // griff_cobra_mk3_mainhull_diffuse_spec.png
    vec4 tex1Sample = texture2D(uTexture1, texCoords);  // griff_cobra_mk3_mainhull_normal.png

    // Placeholder lighting
    vec3 eyeVector = normalize(-vPosition.xyz);
    vec3 lightVector = normalize(vLightVector);
    vec3 normal = normalize(vNormal);
    float intensity = 0.8 * dot(normal, lightVector) + 0.2;
    vec4 diffuseLight = vec4(vec3(intensity), 1.0);

    // Diffuse colour
    vec4 diffuseColor = tex0Sample;
    totalColor += diffuseColor * diffuseLight;

    // Emission (glow)
    vec3 emissionColor = tex1Sample.aaa;
    emissionColor *= vec3(0.99, 0.97, 0.73);
    totalColor += vec4(emissionColor, 0.0);

    gl_FragColor = totalColor;
}

// Uniforms:
{
    uTexture0: { type: "texture", value: 0 },
    uTexture1: { type: "texture", value: 1 }
}vec3 emissionColor = tex1Sample.aaa;, which extracts the alpha channel as instructed and “splats” it into a vec3. When normal mapping is implemented, the normal will be read as vec3 normal = normalize(tex1Sample.rgb); (“rgb” being the default extract mode for normal maps), reusing the same texture sample.As a more concrete example, here’s what happens if you change the
diffuseMap to { name: "griff_cobra_mk3_mainhull_diffuse_spec.png", extract: "brg" }:In the shader, the line
vec4 diffuseColor = tex0Sample; changes to vec4 diffuseColor = vec4(tex0Sample.brg, 1.0);.The extra flexibility also means it would be quite easy to support multiple emission maps, each with their own colours. Intensity could be bound to anything that can be used in a uniform binding. For example, engine glows could be implemented this way, without treating them as a special case.
Another thing to note is the “attributes” section at the top of the vertex shader. Attributes are per-vertex values. In Oolite 1.x, custom shaders can only use the predefined attributes
gl_Vertex, gl_Normal, gl_MultiTexCoord0.st and tangent. These are now deprecated in OpenGL (except tangent, which is a new-style attribute, but hard-coded in Oolite). In Oolite 2, mesh files will be able to specify arbitrary attributes of type float, vec2, vec3 or vec4. Possible uses include multiple sets of texture coordinates, vertex colours, and animation weights. The only required attribute is position, which is needed for simulation purposes. Even if you don’t use any of those, aTexCoords is a lot more convenient than gl_MultiTexCoord0.st.