Skinner’s Den

Discussion and information relevant to creating special missions, new ships, skins etc.

Moderators: another_commander, winston

User avatar
Simon B
---- E L I T E ----
---- E L I T E ----
Posts: 836
Joined: Thu Oct 23, 2008 5:54 am
Location: Red Beach NZ
Contact:

New skinning tutorial:

Post by Simon B »

It has been pointed out to me in private, and repeatedly, that the neolite ships can be a bit intimidating to people contemplating reskinning them.

So I added a new tutorial

It comes in two bits - the first one covers a very simple reworking of the Viper,

Image

and the second is a complete rehash of the Anaconda (which includes UV Mapping, special effects and normal maps).
Image

I've tried to design the ships so they can be reworked by people without access to fancy equipment, who may be a bit on the stick-figure end of the artistic scale.
Simon Bridge
[re2dux] [neolite]
"Everything is perfect down to every last flaw..."
HBT: The Book of Verse - Principia Discordia
User avatar
Simon B
---- E L I T E ----
---- E L I T E ----
Posts: 836
Joined: Thu Oct 23, 2008 5:54 am
Location: Red Beach NZ
Contact:

Post by Simon B »

Asteroids
... as promised.

note - use the alloy-scarred.png texture from the neolite.oxp - and edit the shipdata.plist entry for the asteroid so

Code: Select all

smooth = no;
. For this example I also remapped the asteroid - this is both standard models:

Image

the bumps use normal maps created from the skin (desaturate, sharpen, increase contrast, apply normalmapping tool - chose sobel 3x3 with 0.3 scaling.)

The great thing about this texture is that it gets more uniform towards the edges. This means I can lay out the UV map so that the patterns are in the middle of a continuous area and the outer edges are in the uniform-ish parts ... minimizing seams.

If you leave interpolation switched on you get more of a lumpy potato effect, but there is also a big nasty artifact:
Image

... a smooth effect is acheived by increasing the number of polys - next iteration gives about 200, which I can probably cut down. Or just bevel all the edges (which ads two triangles for each edge and another one for each corner - I've not counted.)
Simon Bridge
[re2dux] [neolite]
"Everything is perfect down to every last flaw..."
HBT: The Book of Verse - Principia Discordia
User avatar
Simon B
---- E L I T E ----
---- E L I T E ----
Posts: 836
Joined: Thu Oct 23, 2008 5:54 am
Location: Red Beach NZ
Contact:

Post by Simon B »

The dirty skins seem more real than the clean ones. The epitome of dirt-effect is acheived with fancy brushes.

GIMP jockey s like myself will appreciate resources: here's a collection of brushes:

http://www.techzilo.com/gimp-brushes/
Of special interest is vector grunge and scratches.

But note - anything in the clipboard will also appear as a brush. Just saying.

If you want to make your own brush, here's a howto.

Tip. To make a peeling decal:
When a decal starts to lift you get a change in color tone.
(See the star and the stripes on the viper pic previous.)

Put the decal image on it's own layer

Select the eraser tool
Set it's opacity to 30%
Select a galaxy or grunge brush

Put the brush partially overlapping the colored part of the image and erase. This will change the color.

Repeat, moving slightly. You can allow some parts to be almost totally erased since decals also get chipped.

See?
Simon Bridge
[re2dux] [neolite]
"Everything is perfect down to every last flaw..."
HBT: The Book of Verse - Principia Discordia
User avatar
Simon B
---- E L I T E ----
---- E L I T E ----
Posts: 836
Joined: Thu Oct 23, 2008 5:54 am
Location: Red Beach NZ
Contact:

Post by Simon B »

Resource - if you find fancy textures and special maps a bit beyand you, have a look at Filter Forge.

Image

There are gratis images and effects based around custom Photoshop filters. Most include normal maps. Some have specular strength and exponent maps too.

Image
... organics are hard. But it's not just big tileable textures like this. Also wee bits that can be added to another texture.

Image

I can't get a clear license on them though - maybe someone can find it? The site license is pretty restrictive, but may not apply to the images themselves.

Suspect that non-commercial use is OK, but the exact terms will probably vary from image to image.

When in doubt, use the idea and make your own. Most of these are from math functions run through filters.
Simon Bridge
[re2dux] [neolite]
"Everything is perfect down to every last flaw..."
HBT: The Book of Verse - Principia Discordia
User avatar
JensAyton
Grand Admiral Emeritus
Posts: 6657
Joined: Sat Apr 02, 2005 2:43 pm
Location: Sweden
Contact:

Post by JensAyton »

Not very useful for spaceship skins, but a very nice tip for texturing in general: The Power of the High Pass Filter (via a comment on the Wolfire blog, which is highly recommended if you’re into game tech and indie games).
User avatar
DaddyHoggy
Intergalactic Spam Assassin
Posts: 8501
Joined: Tue Dec 05, 2006 9:43 pm
Location: Newbury, UK
Contact:

Post by DaddyHoggy »

Ahruman wrote:
Not very useful for spaceship skins, but a very nice tip for texturing in general: The Power of the High Pass Filter (via a comment on the Wolfire blog, which is highly recommended if you’re into game tech and indie games).
Excellent - thanks A!
Selezen wrote:
Apparently I was having a DaddyHoggy moment.
Oolite Life is now revealed here
User avatar
ZygoUgo
---- E L I T E ----
---- E L I T E ----
Posts: 406
Joined: Mon Nov 17, 2008 4:15 pm
Location: Blighty

Post by ZygoUgo »

Hi all, don't know how useful this is to anyone but I am using it as an initial texture to help orientate UV's, in Blender you can set the texture to update in realtime, don't really know about other programs as I'm just learning..
PS.. is it safe for people to right click and down load from here...?
Image
Image
User avatar
tonyhippy
Dangerous
Dangerous
Posts: 90
Joined: Mon Apr 19, 2010 8:23 pm
Location: UK
Contact:

Starbelly Class Sled respray

Post by tonyhippy »

I'm a fan of the Starbelly: An underrated ship with a respectable speed and cargo capacity, but the white colour scheme detracts from the scale and character of the thing. For my own game I've given it a respray. The upper hull has been painted to suggest a transparent pyramidal shell with a busy inner hull showing through.
What I would have liked to do is make the upper hull really shiny to add to the effect and maybe make the lights shine more brightly, but that'd be a tall order on my system, plus I'm just an illustrator and not very computerate. It looks pretty good in game anyway. Try it and see!
Image
User avatar
Lestradae
---- E L I T E ----
---- E L I T E ----
Posts: 3095
Joined: Tue Apr 17, 2007 10:30 pm
Location: Vienna, Austria

..

Post by Lestradae »

Wow, tonyhippy, that's a nice visual rework of a ship I did fly for quite some time :D
User avatar
Thargoid
Thargoid
Thargoid
Posts: 5525
Joined: Thu Jun 12, 2008 6:55 pm

Post by Thargoid »

Do any of you graphics wizards have a contact sheet of "fiddly features" (ports, windows, landing gear, burns, damage etc) that you could share? I'm just finishing off the skin for a new ship and wanted to add all the little details in for a change. But I can't find anything suitable that I can use in GIMP to do it, at least without resorting to drawing something myself which won't look good.
Last edited by Thargoid on Mon Sep 20, 2010 4:58 am, edited 1 time in total.
User avatar
Thargoid
Thargoid
Thargoid
Posts: 5525
Joined: Thu Jun 12, 2008 6:55 pm

Post by Thargoid »

This post doesn't exist. You are imagining things.

Nothing to see here, these are not the words you are looking for. Move along, move along ;)

Just to keep things going...
Last edited by Thargoid on Mon Sep 20, 2010 12:42 pm, edited 3 times in total.
User avatar
Commander McLane
---- E L I T E ----
---- E L I T E ----
Posts: 9520
Joined: Thu Dec 14, 2006 9:08 am
Location: a Hacker Outpost in a moderately remote area
Contact:

Post by Commander McLane »

Accidentally hitting "quote" instead of "edit"? :wink:
User avatar
Thargoid
Thargoid
Thargoid
Posts: 5525
Joined: Thu Jun 12, 2008 6:55 pm

Post by Thargoid »

Commander McLane wrote:
Accidentally hitting "quote" instead of "edit"? :wink:
Yup
User avatar
Commander McLane
---- E L I T E ----
---- E L I T E ----
Posts: 9520
Joined: Thu Dec 14, 2006 9:08 am
Location: a Hacker Outpost in a moderately remote area
Contact:

Post by Commander McLane »

Thargoid wrote:
This post doesn't exist.

Nothing to see here, move along, move along ;)
Ah!, now this has become a case of there is no post. :wink:
User avatar
Smivs
Retired Assassin
Retired Assassin
Posts: 8408
Joined: Tue Feb 09, 2010 11:31 am
Location: Lost in space
Contact:

Post by Smivs »

Now here's a funny thing...actually a very annoying thing. Does anyone have any ideas?
It concerns the model and texture for the Asp. The texture seems to be distorting in the cockpit area as it wraps around the model. I first noticed this when I did the original Smivs'Shipset and to be honest I fudged it by using an oval cockpit window which concealed the distortion.
However as I'm now updateing these again I really need a rectangular cockpit area.
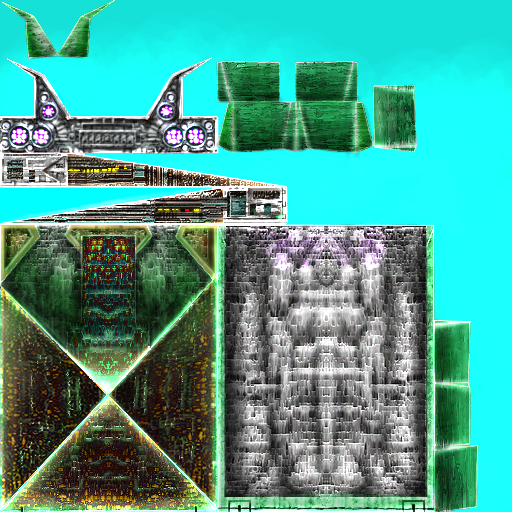
Below are two images. The first is a 'test' cockpit designed to show the problem. As you can see it's perfectly rectangular.

Image

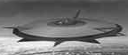
This (below) is how it appears on the ship when spawned in the game.

Image

You can clearly see the distortion. I have no idea what is causing this.
The texture used started life in Oolite v1.65 (which is the version I had installed when I started working on the Shipset) and for the screenshot has been applied to the .dat file from v1.65.
I actually tracked-down v1.73, and have v1.74.2 installed and tried the texture on these models as well. v1.73 was a disaster but 1.74.2 wasn't too bad but still worse than using the correct (v1.65) model.
Other than distorting the texture in a way that 'un-distorts' when applied to the model I can't think of a way around this.
Does anyone know what's going on here and if there's anything I can do to sort it out?
Commander Smivs, the friendliest Gourd this side of Riedquat.
Post Reply