Probably a simple question, but if I've done a subdivision into 4 squares on each side, how would I say divide one of the faces into 2 triangles, corner to corner?
!m!
Join us at the Oolite Anniversary Party -- London, 7th July 2024, 1pm
More details in this thread.
More details in this thread.
Blender 3d Modeling Tutorials
Moderators: another_commander, winston
-
maaarcooose

- ---- E L I T E ----

- Posts: 397
- Joined: Sun May 29, 2011 9:36 pm
- Location: Devon, UK
- Contact:
Re: Blender 3d Modeling Tutorials
Trading computers and writing stuff....
Website: http://www.theramist.co.uk/
OOliteInfo: http://www.theramist.co.uk/ooliteinfo/oo.php
Website: http://www.theramist.co.uk/
OOliteInfo: http://www.theramist.co.uk/ooliteinfo/oo.php
-
Staer9

- ---- E L I T E ----
- Posts: 570
- Joined: Fri Feb 18, 2011 4:53 pm
- Location: Hatfield, Hertfordshire (poor industrial)
Re: Blender 3d Modeling Tutorials
How to triangulate quads (make squares triangles):maaarcooose wrote:Probably a simple question, but if I've done a subdivision into 4 squares on each side, how would I say divide one of the faces into 2 triangles, corner to corner?
!m!
First select the square, then (still in edit mode) press space,
Type 'quads' in the search bar (this is also a good way of finding other functions)
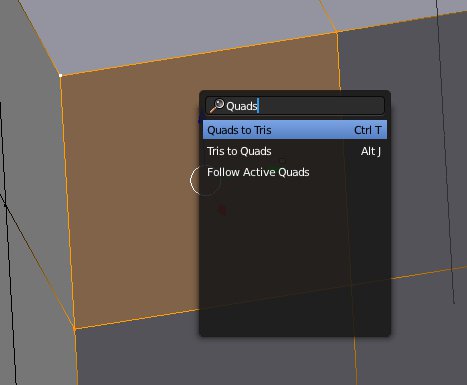
select 'quads to tris' and the square will be replaced with two trianges.
this also tells you that the hotkey is 'Ctrl > t'
-
maaarcooose
- ---- E L I T E ----
- Posts: 397
- Joined: Sun May 29, 2011 9:36 pm
- Location: Devon, UK
- Contact:
Re: Blender 3d Modeling Tutorials
Awesome. Thanks for the quick response.Staer9 wrote:How to triangulate quads (make squares triangles):
First select the square, then (still in edit mode) press space,
Type 'quads' in the search bar (this is also a good way of finding other functions)
select 'quads to tris' and the square will be replaced with two trianges.
this also tells you that the hotkey is 'Ctrl > t'
This tutorial thread gets better and better.
!m!
Trading computers and writing stuff....
Website: http://www.theramist.co.uk/
OOliteInfo: http://www.theramist.co.uk/ooliteinfo/oo.php
Website: http://www.theramist.co.uk/
OOliteInfo: http://www.theramist.co.uk/ooliteinfo/oo.php
-
maaarcooose
- ---- E L I T E ----
- Posts: 397
- Joined: Sun May 29, 2011 9:36 pm
- Location: Devon, UK
- Contact:
Re: Blender 3d Modeling Tutorials
One thing with that though, how do you define which corners the triangles divide from and to?
By doing that, all 4 squares are divided into triangles top right to bottom left.
What if you want all the divisions to go inwards to the centre point?
!m!
By doing that, all 4 squares are divided into triangles top right to bottom left.
What if you want all the divisions to go inwards to the centre point?
!m!
Trading computers and writing stuff....
Website: http://www.theramist.co.uk/
OOliteInfo: http://www.theramist.co.uk/ooliteinfo/oo.php
Website: http://www.theramist.co.uk/
OOliteInfo: http://www.theramist.co.uk/ooliteinfo/oo.php
-
maaarcooose
- ---- E L I T E ----
- Posts: 397
- Joined: Sun May 29, 2011 9:36 pm
- Location: Devon, UK
- Contact:
Re: Blender 3d Modeling Tutorials
It's okay...
After some messing around I've worked it out.
Select 2 vertecies, hit f (Make Face/Edge)
!m!
After some messing around I've worked it out.
Select 2 vertecies, hit f (Make Face/Edge)
!m!
Trading computers and writing stuff....
Website: http://www.theramist.co.uk/
OOliteInfo: http://www.theramist.co.uk/ooliteinfo/oo.php
Website: http://www.theramist.co.uk/
OOliteInfo: http://www.theramist.co.uk/ooliteinfo/oo.php
-
Staer9
- ---- E L I T E ----
- Posts: 570
- Joined: Fri Feb 18, 2011 4:53 pm
- Location: Hatfield, Hertfordshire (poor industrial)
Re: Blender 3d Modeling Tutorials
and of course you can do it this way: (but it might take longer)
First select the face then press delete and select the 'only faces' option,
then select the three vertexes you want to be made into one triangle and press 'f',
then select the other three and press 'f'...
if you want this to be done over your entire model it may take some time
First select the face then press delete and select the 'only faces' option,
then select the three vertexes you want to be made into one triangle and press 'f',
then select the other three and press 'f'...
if you want this to be done over your entire model it may take some time
-
RyanHoots

- ---- E L I T E ----
- Posts: 958
- Joined: Fri May 20, 2011 8:10 pm
- Location: Nowhere
- Contact:
Re: Blender 3d Modeling Tutorials
How would you do textures in blender? Is there a way similar to Wings 3D where you can make a diffuse map?

-
Staer9
- ---- E L I T E ----
- Posts: 570
- Joined: Fri Feb 18, 2011 4:53 pm
- Location: Hatfield, Hertfordshire (poor industrial)
Re: Blender 3d Modeling Tutorials
Make a texture (as explained in the texturing tutorial),RyanHoots wrote:How would you do textures in blender? Is there a way similar to Wings 3D where you can make a diffuse map?
colour it white with the texture paint mode,
save you blender file,
go to image > pack as PNG in the texture window,
go to image > Unpack in the texture window, then choose 'create textures // untitled'
you should now have a texture in a folder where your model was saved, with white on a black background, you may have to add the .png suffix to the name.
Tomorrrow I will update the texture tutorial to include this information, and hopefully in more detail.
-
RyanHoots
- ---- E L I T E ----
- Posts: 958
- Joined: Fri May 20, 2011 8:10 pm
- Location: Nowhere
- Contact:
Re: Blender 3d Modeling Tutorials
Thanks, I hope to start modelling after I download Blender.Staer9 wrote:Make a texture (as explained in the texturing tutorial),RyanHoots wrote:How would you do textures in blender? Is there a way similar to Wings 3D where you can make a diffuse map?
colour it white with the texture paint mode,
save you blender file,
go to image > pack as PNG in the texture window,
go to image > Unpack in the texture window, then choose 'create textures // untitled'
you should now have a texture in a folder where your model was saved, with white on a black background, you may have to add the .png suffix to the name.
Tomorrrow I will update the texture tutorial to include this information, and hopefully in more detail.

Re: Blender 3d Modeling Tutorials
This is how far I got on my Kzin Carrier before I got stuck:
http://img607.imageshack.us/img607/1976 ... xample.png
The top should be a bubble, with portholes, while the other protrusions would be weapons emplacements, and antenna.
When I go beyond this step, however, I end up with a mess. I don't understand the "Unwrap" process, and why it is necessary. The artistic side of me just wants to take what is pictured, and start smoothing it out, detailing it, and painting it with appropriate shadow textures. I take the steps you describe, and get basically where I'm suppose to be, but it doesn't make sense to me, and when I texture paint, it just looks like a mess. Could you tell me what it is I'm doing wrong, or if my image is just plain out of whack? Thanks.
-
Staer9
- ---- E L I T E ----
- Posts: 570
- Joined: Fri Feb 18, 2011 4:53 pm
- Location: Hatfield, Hertfordshire (poor industrial)
Re: Blender 3d Modeling Tutorials
Firstly, congratulations for getting this far!
The "unwrap" process is Basicly just a way of making the 3d model 2d, this enables a texture to be put onto it. It is not neccessary to use the texture-paint mode and I will happily admit that it is aweful. what you can do after unwraping the texture is save it as a .png file and edit it in Gimp/Photoshop, that way you will have much more freedom to create the sort of texture you want, however, you will be unable to see what it looks like in real-time. You will have to keep saving the image and loading it into blender.
But more importantly this is not a texture tutorial thread. If you do plan on texturing use these steps:
If you feel that you are unhappy with your model and want to add more detail, go for it. To make it look smooth press 'w' then click 'Shade smooth'
Unfortunately there is a slight problem with your model:
The weapons are single edges, you will need to make them faces or they will be invisible to Oolites gaming engine.
But other than that there is nothing you are doing wrong (one thing that you shoud try is selecting the whole model in edit mode and pressing Ctrl > n at the same time, this will fix all the normals (don't worry about the technical term, just do it anyway))
The "unwrap" process is Basicly just a way of making the 3d model 2d, this enables a texture to be put onto it. It is not neccessary to use the texture-paint mode and I will happily admit that it is aweful. what you can do after unwraping the texture is save it as a .png file and edit it in Gimp/Photoshop, that way you will have much more freedom to create the sort of texture you want, however, you will be unable to see what it looks like in real-time. You will have to keep saving the image and loading it into blender.
But more importantly this is not a texture tutorial thread. If you do plan on texturing use these steps:
then visit one of the texture tutorial threads for tips from the Skinners.Make a texture (as explained in the texturing tutorial),
colour it white with the texture paint mode,
save you blender file,
go to image > pack as PNG in the texture window,
go to image > Unpack in the texture window, then choose 'create textures // untitled'
If you feel that you are unhappy with your model and want to add more detail, go for it. To make it look smooth press 'w' then click 'Shade smooth'
Unfortunately there is a slight problem with your model:
The weapons are single edges, you will need to make them faces or they will be invisible to Oolites gaming engine.
But other than that there is nothing you are doing wrong (one thing that you shoud try is selecting the whole model in edit mode and pressing Ctrl > n at the same time, this will fix all the normals (don't worry about the technical term, just do it anyway))
Re: Blender 3d Modeling Tutorials
I did what you suggested and tried using Gimp to further the design of the Kzin Ship, and I did get it a little closer to what I had in mind, but it needs a lot more work. I posted this in Skinner's Den, asking for advice, and I'm waiting for a response. I wish I knew what I was doing better, as I feel like I'm groping in the dark. Here is the latest rendition of the Kzin Carrier/Battle Cruiser:
http://img715.imageshack.us/img715/981/kzinship5.png
http://img715.imageshack.us/img715/981/kzinship5.png
-
DaddyHoggy

- Intergalactic Spam Assassin

- Posts: 8501
- Joined: Tue Dec 05, 2006 9:43 pm
- Location: Newbury, UK
- Contact:
Re: Blender 3d Modeling Tutorials
Why don't you post a link to your 3D model and to your texture as is and somebody could see how you've textured it already and perhaps offer suggestions of how to texture it better? All we've got at the moment is a red, not quite a sphere to work on.mandoman wrote:I did what you suggested and tried using Gimp to further the design of the Kzin Ship, and I did get it a little closer to what I had in mind, but it needs a lot more work. I posted this in Skinner's Den, asking for advice, and I'm waiting for a response. I wish I knew what I was doing better, as I feel like I'm groping in the dark. Here is the latest rendition of the Kzin Carrier/Battle Cruiser:
http://img715.imageshack.us/img715/981/kzinship5.png
I don't use Blender I use Wings3D and AC3D but I do use GIMP to produce my textures, so I might be able to help a little bit (and Simon B did some excellent GIMP texturing tutorials somewhere on the BB - if I find them - I'll post the link(s))
Oolite Life is now revealed hereSelezen wrote:Apparently I was having a DaddyHoggy moment.
Re: Blender 3d Modeling Tutorials
OK, here is the basic structure:
http://img819.imageshack.us/img819/1976 ... xample.png
Here is the structure unwrapped:
http://img225.imageshack.us/img225/8084 ... inship.png
Once again, I know I have a long way to go with texturing, and shading.
http://img819.imageshack.us/img819/1976 ... xample.png
Here is the structure unwrapped:
http://img225.imageshack.us/img225/8084 ... inship.png
Once again, I know I have a long way to go with texturing, and shading.
-
DaddyHoggy
- Intergalactic Spam Assassin
- Posts: 8501
- Joined: Tue Dec 05, 2006 9:43 pm
- Location: Newbury, UK
- Contact:
Re: Blender 3d Modeling Tutorials
I was hoping you'd post a link to the actual 3d model file - so that somebody else could find a way to break it up "better". Looking at your unwrap (is that a blender default) - you haven't got a hope in hell of texturing it. A nice unwrap will have each of the polygons as flat as possible - yours still has much of curvature of the shape transposed on to the flat 2D plane of the texture - so some of the polygons are only a few pixels across even though they're exactly the same size (on the model) as another polygon that on the texture plane is many tens of pixels across - so you can't possibly put a nice texture on that.
Unwrapping is a horrible process to do well - and you've picked a particularly gruesome shape to try - in something like Wings3D you can force a hard edge and perform a spherical unwarp, much like running a knife through an orange peel top to bottom (pole to pole) in one line and unpeeling it and pressing the peel flat onto a sheet of paper. That's the position you need to get into - an unfolded shape with as many of the polygons "flat" (correct shape) on the surface of the texture map as possible.
Don't be disheartened but I hope this helps!
Oolite Life is now revealed hereSelezen wrote:Apparently I was having a DaddyHoggy moment.