Slightly OT, but this makes me wonder how you explain internal equipment being damaged before the shields are all gone..Frame wrote:Player Energy is also a sort of shield, however this hugs the hull of the ship, you could compare it to polarize hull technique as seen in Enterprise.. You could even argue that it creates small force fields whenever a hull breach is detected..
so everything is basicly a shield, which means, when the energy and shield is gone the next shot is going to kill the ship... It also means we avoid having to think about that a shot through something as empty cargo rooms, shouldn't kill you... but we could argue that the power a laser of the magnitude that Oolite is using would be very powerfull, and raise the temperature inside the ship considerably as to almost instantly and melt the entire hull and inadvertently trigger something explosive..
So the point:
instead of scorch marks (which are cool to look at), my suggestion would be to use a Texture that makes an energy spark fluctuation animation around the ship while the energy regenerates... (or shield if the player).
Griff ships with player-defined decals
Moderators: another_commander, winston
-
Diziet Sma

- ---- E L I T E ----

- Posts: 6312
- Joined: Mon Apr 06, 2009 12:20 pm
- Location: Aboard the Pitviper S.E. "Blackwidow"
Most games have some sort of paddling-pool-and-water-wings beginning to ease you in: Oolite takes the rather more Darwinian approach of heaving you straight into the ocean, often with a brick or two in your pockets for luck. ~ Disembodied
-
DaddyHoggy

- Intergalactic Spam Assassin

- Posts: 8515
- Joined: Tue Dec 05, 2006 9:43 pm
- Location: Newbury, UK
- Contact:
A localised "puncturing" or destabilising of the (shield) field(s) caused by a lucky hit - i.e. impact vector of the beam normalised to shield vector field direction and/or momentary overloading of specific shield emitters and/or (related) beam does not sweep the ship but stays localised to a set area of the ship thus causing a localised overloading/breach of the shield.Diziet Sma wrote:Slightly OT, but this makes me wonder how you explain internal equipment being damaged before the shields are all gone..Frame wrote:Player Energy is also a sort of shield, however this hugs the hull of the ship, you could compare it to polarize hull technique as seen in Enterprise.. You could even argue that it creates small force fields whenever a hull breach is detected..
so everything is basicly a shield, which means, when the energy and shield is gone the next shot is going to kill the ship... It also means we avoid having to think about that a shot through something as empty cargo rooms, shouldn't kill you... but we could argue that the power a laser of the magnitude that Oolite is using would be very powerfull, and raise the temperature inside the ship considerably as to almost instantly and melt the entire hull and inadvertently trigger something explosive..
So the point:
instead of scorch marks (which are cool to look at), my suggestion would be to use a Texture that makes an energy spark fluctuation animation around the ship while the energy regenerates... (or shield if the player).
Oolite Life is now revealed hereSelezen wrote:Apparently I was having a DaddyHoggy moment.
-
Killer Wolf

- ---- E L I T E ----
- Posts: 2308
- Joined: Tue Jan 02, 2007 12:38 pm
thought about the damage aspect here
https://bb.oolite.space/viewtopic.php?p= ... ht=#101321
"Slightly OT, but this makes me wonder how you explain internal equipment being damaged before the shields are all gone.."
emp, physical shockwaves perhaps?
https://bb.oolite.space/viewtopic.php?p= ... ht=#101321
"Slightly OT, but this makes me wonder how you explain internal equipment being damaged before the shields are all gone.."
emp, physical shockwaves perhaps?
-
Diziet Sma
- ---- E L I T E ----
- Posts: 6312
- Joined: Mon Apr 06, 2009 12:20 pm
- Location: Aboard the Pitviper S.E. "Blackwidow"
DaddyHoggy wrote:A localised "puncturing" or destabilising of the (shield) field(s) caused by a lucky hit - i.e. impact vector of the beam normalised to shield vector field direction and/or momentary overloading of specific shield emitters and/or (related) beam does not sweep the ship but stays localised to a set area of the ship thus causing a localised overloading/breach of the shield.
Most games have some sort of paddling-pool-and-water-wings beginning to ease you in: Oolite takes the rather more Darwinian approach of heaving you straight into the ocean, often with a brick or two in your pockets for luck. ~ Disembodied


-
JensAyton

- Grand Admiral Emeritus

- Posts: 6657
- Joined: Sat Apr 02, 2005 2:43 pm
- Location: Sweden
- Contact:
Shaders can’t save any state between frames, and there is currently no way for scripts to send arbitrary information to shaders. This is fixable, but as usual, I don’t want to be heaping on features at this time.
E-mail: [email protected]
-
Diziet Sma
- ---- E L I T E ----
- Posts: 6312
- Joined: Mon Apr 06, 2009 12:20 pm
- Location: Aboard the Pitviper S.E. "Blackwidow"
Somebody take note of this for after 1.74 is released..Ahruman wrote:Shaders can’t save any state between frames, and there is currently no way for scripts to send arbitrary information to shaders. This is fixable, but as usual, I don’t want to be heaping on features at this time.
Most games have some sort of paddling-pool-and-water-wings beginning to ease you in: Oolite takes the rather more Darwinian approach of heaving you straight into the ocean, often with a brick or two in your pockets for luck. ~ Disembodied
-
JensAyton
- Grand Admiral Emeritus
- Posts: 6657
- Joined: Sat Apr 02, 2005 2:43 pm
- Location: Sweden
- Contact:
That would be “after MNSR is released”. Also, it’s only the second half that’s fixable.
E-mail: [email protected]

how would this 'roughing up' be done?DaddyHoggy wrote:Nice decal but it needs some roughing up, it's just too clean for the ship its painted on to!El Viejo wrote:Or there's the WWII Cobra:

I have my decal on a 'checkerboard' background. All good. I have a separate file which is a picture of 'grey bricks' which I can overlay on the decal to provide the roughness. But can I (easily) get the bricks on just the decal part of the decal image? Something to do with layers and masks, but this is all quite new to me.... I have PS Elements 5.0, and could easily get GIMP. Any hints gratefully received.
-
Cmd. Cheyd
- ---- E L I T E ----
- Posts: 934
- Joined: Tue Dec 16, 2008 2:52 pm
- Location: Deep Horizon Industries Manufacturing & Research Site somewhere in G8...
If you'll take a look inside the Skinner's Den thread, I believe it was SimonB who postet a good tutorial on creating a worn / weathered look.
Find my OXP's at:
Deep Horizon Industries - Your Planet Our Design
Deep Horizon Industries - Your Planet Our Design
Hi Cmd. C. Thanks for the speeedy response!
I have had a look through the thread, but SimonB's weathering deals with full skins (unless I am missing sthg - which is possible). My question is more to do with combining two layers of differing shape whilst 'preserving' only the smaller shape. I have my 'clean' little decal in one layer, and a big o'l picture of a brick wall in another layer.
I can slap the two layers together, and tweak the opacity. But I will always end up with a small decal inside a big ol' rectangle. Unless I spend ages deleting the non-overlapping parts. I'm not describing it well.
Could I create a mask from the decal, then use the mask to make the selection from the 'weathered' layer, and then line the two up manually?
I did find an alternative from the Skinners Den thread:
Simon B wrote:The dirty skins seem more real than the clean ones. The epitome of dirt-effect is acheived with fancy brushes.
GIMP jockey s like myself will appreciate resources: here's a collection of brushes:
http://www.techzilo.com/gimp-brushes/
Of special interest is vector grunge and scratches.

Activate the decal layer.lfnfan wrote:My question is more to do with combining two layers of differing shape whilst 'preserving' only the smaller shape. I have my 'clean' little decal in one layer, and a big o'l picture of a brick wall in another layer.
Select the empty space around you decal with magic wand.
Activate brick wall layer.
Hit delete.
Hope this helps...
...and keep it under lightspeed!
Friendliest Meteor Police that side of Riedquat
![[EliteWiki]](/images/elitewikismall.png) Far Arm ships
Far Arm ships
Z-ships
Baakili Far Trader
Tin of SPAM
Friendliest Meteor Police that side of Riedquat

I've been having a slightly unusual problem with the decal myself. When I first installed the oxp I saw Griffs decal no problem.
So I created my own and put in the folder with the same file name as Griffs, but it didnt show. Its definitely a png, with transparent area (I'm fairly good with Corel and photoshop). So I reinserted Griffs, and that wont show either?!
Could there be any reason you can think of why that might be happening? I have looked at the shipdata plist but I'm 99.99999% that I haven't changed anything accidentally.
-
Diziet Sma
- ---- E L I T E ----
- Posts: 6312
- Joined: Mon Apr 06, 2009 12:20 pm
- Location: Aboard the Pitviper S.E. "Blackwidow"
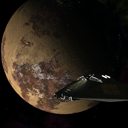
Hmm.. minor typo with the filename maybe? With the typo also passed along to the (I assume) renamed griff_player_decal.png perhaps? Did you hold down shift when starting Oolite, after making your changes?
As you can see, no probs with my decal..
As you can see, no probs with my decal..
Most games have some sort of paddling-pool-and-water-wings beginning to ease you in: Oolite takes the rather more Darwinian approach of heaving you straight into the ocean, often with a brick or two in your pockets for luck. ~ Disembodied
-
Griff

- Oolite 2 Art Director
- Posts: 2510
- Joined: Fri Jul 14, 2006 12:29 pm
- Location: Probably hugging his Air Fryer
i think the 'trunk' builds of Oolite currently have problems with decals on the player ship, but they should be ok in the test release (oolite 1.73.4)
also, it might be worth checking the filename of your decal image against the filename as listed in the oxp's shipdata.plist just to make sure they are the same, to do this
open shipdata.plist from the oxp in a text editor, the player ships have _player written after their name, eg
"griff_normalmapped_adder_player" or "griff_normalmapped_anaconda_player", inside the 'shaders' part of their data, there's a list of 'textures', the decal is the last one in the list, eg
also the moray & fer-de-lance ships don't support decals, there just wasn't a spare texture available for them after all the effects maps etc they use i'm afraid.
regarding another quick way of weathering a decal, once you've got all the transparency sorted and you can see your decal sitting on a checkerboard background in photoshop/gimp etc, grab the eraser brush with a fairly strong opacity 50-60% and one of those blobby style brushes set to a fairly small size and just rub out some of the decal image/nibble away at it's edges (actually save a copy of your decal image first and do this on the copy incase you go wrong), in game, it'll look as if the paint has chipped away, you could also lower the opacity of the entire layer by a few % so that some of the hull paint shows through it slightly in game
also, it might be worth checking the filename of your decal image against the filename as listed in the oxp's shipdata.plist just to make sure they are the same, to do this
open shipdata.plist from the oxp in a text editor, the player ships have _player written after their name, eg
"griff_normalmapped_adder_player" or "griff_normalmapped_anaconda_player", inside the 'shaders' part of their data, there's a list of 'textures', the decal is the last one in the list, eg
Code: Select all
textures =
	(
	"griff_anaconda_diffuse.png",
        "griff_anaconda_normal.png",
	"griff_anaconda_eng_gun_effects.png",
	"griff_player_decal.png"
	);
regarding another quick way of weathering a decal, once you've got all the transparency sorted and you can see your decal sitting on a checkerboard background in photoshop/gimp etc, grab the eraser brush with a fairly strong opacity 50-60% and one of those blobby style brushes set to a fairly small size and just rub out some of the decal image/nibble away at it's edges (actually save a copy of your decal image first and do this on the copy incase you go wrong), in game, it'll look as if the paint has chipped away, you could also lower the opacity of the entire layer by a few % so that some of the hull paint shows through it slightly in game
Last edited by Griff on Thu Mar 11, 2010 1:49 pm, edited 2 times in total.