Nice you started to get into 3D-modeling! Looking forward to the new models and such. The texture however is now a bit a rough version I assume?
texturing with Wings3d
Moderators: another_commander, winston
-
pagroove
- ---- E L I T E ----

- Posts: 3035
- Joined: Wed Feb 21, 2007 11:52 pm
- Location: On a famous planet
Hey MCLane,
Nice you started to get into 3D-modeling! Looking forward to the new models and such. The texture however is now a bit a rough version I assume?

Nice you started to get into 3D-modeling! Looking forward to the new models and such. The texture however is now a bit a rough version I assume?
For P.A. Groove's music check
https://soundcloud.com/p-a-groove
Famous Planets v 2.7. (for Povray)

https://bb.oolite.space/viewtopic.php?f=4&t=13709
https://soundcloud.com/p-a-groove
Famous Planets v 2.7. (for Povray)
https://bb.oolite.space/viewtopic.php?f=4&t=13709
-
Commander McLane
- ---- E L I T E ----
- Posts: 9520
- Joined: Thu Dec 14, 2006 9:08 am
- Location: a Hacker Outpost in a moderately remote area
- Contact:
-
CaptSolo

- ---- E L I T E ----
- Posts: 912
- Joined: Wed Feb 23, 2011 10:08 pm
- Location: Preying Manta
- Contact:
Re: texturing with Wings3d
Bumping this thread to the top for WIP reference.
I tried the methods in this thread but found a YouTube video that seems to work:
1) Select entire model
2) Right click and select UV Mapping
3) In that window I select adjacent edges to unfold into three sections
4) Right click and select, Mark Edges for Cut
5) Right click, select Continue > Unfold
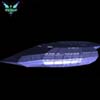
Granted, this is a simple model more Elite than Oolite:

I tried the methods in this thread but found a YouTube video that seems to work:
1) Select entire model
2) Right click and select UV Mapping
3) In that window I select adjacent edges to unfold into three sections
4) Right click and select, Mark Edges for Cut
5) Right click, select Continue > Unfold
Granted, this is a simple model more Elite than Oolite:
-
Griff

- Oolite 2 Art Director
- Posts: 2510
- Joined: Fri Jul 14, 2006 12:29 pm
- Location: Probably hugging his Air Fryer
Re: texturing with Wings3d
Nice ship there CaptSolo! and a neat tutorial on UV unwrapping! remember to scale up those UV 'islands' to make the most of all that lovely texture space, just don't overlap any islands or go outside of that blue border (unless your doing some large repeating pattern like a space station wall or something - if you are doing this remember to set your texture to repeat in the shipdata.plist
Code: Select all
textures =
   (
     {name = "my_big_space_station_wall.png"; repeat_s = "yes"; repeat_t = "yes";}
   );
Wiki homepage for my OXP: http://wiki.alioth.net/index.php/Griff_Industries
-
CaptSolo
- ---- E L I T E ----
- Posts: 912
- Joined: Wed Feb 23, 2011 10:08 pm
- Location: Preying Manta
- Contact:
Re: texturing with Wings3d
Ta Griff.
For testing, I applied a solid color in GIMP to the islands but making it apply to the model in Wings was a headache. I'm a beginner you know. Found no assistance here as it seems the latest version works differently then what the other fellows were using. So stumbling about trying this and that I eventually hit on what I hope is the correct procedure. To sum up briefly, the outliner window has something called default, and that needs to have the diffuse map point to the texture. It worked but I'll wager there are more problems to overcome.
For testing, I applied a solid color in GIMP to the islands but making it apply to the model in Wings was a headache. I'm a beginner you know. Found no assistance here as it seems the latest version works differently then what the other fellows were using. So stumbling about trying this and that I eventually hit on what I hope is the correct procedure. To sum up briefly, the outliner window has something called default, and that needs to have the diffuse map point to the texture. It worked but I'll wager there are more problems to overcome.

Re: texturing with Wings3d
I'll add my way of doing this:
1. Define areas you want as contiguous in the UV map with hard edges (select border edges of the area, right-click, select Hardness from the menu and then Hard). Repeat until all areas are defined. I usually select the areas so that projecting them to flat surface distorts them (or the texture applied to them) as little as possible. .
2. Use Wings3D's own unwrapping - select all faces (tip: select the object in body selection mode and switch to faces selection mode), right-click, select .UV Mapping., right-click, select Continue and then Projection Normal.
In the pic below you see an example at this stage, Asp Explorer from my Z-ships OXP. Hard edges are orange, and the default helper texture is applied (the UV map is a mess at this stage).

Click on the pic to see it bigger
3. Rotate, scale, move & optionally combine the different parts of the UV map to utilize available space well and to get a coherent view of the model's surfaces. This part can be quite tedious if the model is complex and you have lots of areas surrounded by hard edges. In the pic below is again the same ship showing how I have rearranged the original UV map mess (seems to be the Police/Navy -variant).

Click on the pic to see it bigger
4. Save the UV map to disk, to serve as a base for texturing - deselect all faces/objects in the UV Editor Window, right-click and select Create Texture, select the newly created *ship*_auv (*ship* = name of the object you're UV mapping) in Outliner and Export. I usually make two of these, one with only border edges drawn and one with all edges drawn, and make these images with doubled dimensions compared to final texture size (2048x2048 for 1024x1024 texture). At least in earlier versions of Wings 3D (Windows XP), maybe even the latest stable-feeling (1.2), .png would result in a corrupt file, so other formats have to be used (.bmp seems to work fine, and because it is uncompressed, it doesn't introduce any artifacts). For some unknown reason these images tend to have holes in some edges (flood fill reveals these ), so plugging them helps a lot when you use these images in making the texture.
5. Proceed to make a great texture .
.
To check your texture on the model, import it to Wings3D and apply it on the mesh: File -> Import Image... -> select the imported image in Outliner -> right-click -> Pick up Image -> select *ship*_auv in Outliner -> right-click -> Drop picked object -> Diffuse.
When you're satisfied, export the mesh as .obj and convert it to .dat. You can change all edges to Soft before exporting, but you can also define (up to 10? or 8? or 9?) Smooth Groups with hard edges, so your ship can have the Smooth attribute as true in Oolite and retain sharp bends where needed. For complex structures, you should use subentities along with hard edges/smooth groups.
Hope some of this helps someone.
1. Define areas you want as contiguous in the UV map with hard edges (select border edges of the area, right-click, select Hardness from the menu and then Hard). Repeat until all areas are defined. I usually select the areas so that projecting them to flat surface distorts them (or the texture applied to them) as little as possible. .
2. Use Wings3D's own unwrapping - select all faces (tip: select the object in body selection mode and switch to faces selection mode), right-click, select .UV Mapping., right-click, select Continue and then Projection Normal.
In the pic below you see an example at this stage, Asp Explorer from my Z-ships OXP. Hard edges are orange, and the default helper texture is applied (the UV map is a mess at this stage).

Click on the pic to see it bigger
3. Rotate, scale, move & optionally combine the different parts of the UV map to utilize available space well and to get a coherent view of the model's surfaces. This part can be quite tedious if the model is complex and you have lots of areas surrounded by hard edges. In the pic below is again the same ship showing how I have rearranged the original UV map mess (seems to be the Police/Navy -variant).

Click on the pic to see it bigger
4. Save the UV map to disk, to serve as a base for texturing - deselect all faces/objects in the UV Editor Window, right-click and select Create Texture, select the newly created *ship*_auv (*ship* = name of the object you're UV mapping) in Outliner and Export. I usually make two of these, one with only border edges drawn and one with all edges drawn, and make these images with doubled dimensions compared to final texture size (2048x2048 for 1024x1024 texture). At least in earlier versions of Wings 3D (Windows XP), maybe even the latest stable-feeling (1.2), .png would result in a corrupt file, so other formats have to be used (.bmp seems to work fine, and because it is uncompressed, it doesn't introduce any artifacts). For some unknown reason these images tend to have holes in some edges (flood fill reveals these
5. Proceed to make a great texture
To check your texture on the model, import it to Wings3D and apply it on the mesh: File -> Import Image... -> select the imported image in Outliner -> right-click -> Pick up Image -> select *ship*_auv in Outliner -> right-click -> Drop picked object -> Diffuse.
When you're satisfied, export the mesh as .obj and convert it to .dat. You can change all edges to Soft before exporting, but you can also define (up to 10? or 8? or 9?) Smooth Groups with hard edges, so your ship can have the Smooth attribute as true in Oolite and retain sharp bends where needed. For complex structures, you should use subentities along with hard edges/smooth groups.
Hope some of this helps someone
...and keep it under lightspeed!
Friendliest Meteor Police that side of Riedquat
![[EliteWiki]](/images/elitewikismall.png) Far Arm ships
Far Arm ships
Z-ships
Baakili Far Trader
Tin of SPAM
Friendliest Meteor Police that side of Riedquat
-
Killer Wolf

- ---- E L I T E ----
- Posts: 2308
- Joined: Tue Jan 02, 2007 12:38 pm
Re: texturing with Wings3d
to slightly derail this, can someone tell me how to find coordinates in Wings? Milkshape shows the coordinates of your cursor so to find gun/view positions etc you just select a view, place your cursor and note the coords ~ what's the trick in Wings?
TIA
TIA
Re: texturing with Wings3d
Select a vertex to see its coordinates, select an edge to see its center point coordinates and select a face to see its center point coordinates.Killer Wolf wrote:to slightly derail this, can someone tell me how to find coordinates in Wings? Milkshape shows the coordinates of your cursor so to find gun/view positions etc you just select a view, place your cursor and note the coords ~ what's the trick in Wings?
...and keep it under lightspeed!
Friendliest Meteor Police that side of Riedquat
Far Arm ships
Z-ships
Baakili Far Trader
Tin of SPAM
Friendliest Meteor Police that side of Riedquat
-
Killer Wolf
- ---- E L I T E ----
- Posts: 2308
- Joined: Tue Jan 02, 2007 12:38 pm
Re: texturing with Wings3d
ta, but that's not really much use unless the feature happens to sit at a particular midpoint. and what about features that are separate? i'm fiddling w/ external missiles and need a position to gen them up from, suspended below the ship's belly.
Re: texturing with Wings3d
You can of course save a copy of the model, and create such points to the copy (keeping the actual model intact), mid- or not, to get the coordinates. Then you decide how much below (or to any direction) you want to place your entity. I'm afraid that you need to do some calculations and/or make some estimates to get your stuff positioned the way you want.
...and keep it under lightspeed!
Friendliest Meteor Police that side of Riedquat
Far Arm ships
Z-ships
Baakili Far Trader
Tin of SPAM
Friendliest Meteor Police that side of Riedquat
-
Selezen

- ---- E L I T E ----
- Posts: 2530
- Joined: Tue Mar 29, 2005 9:14 am
- Location: Tionisla
- Contact:
Re: texturing with Wings3d
You can export the model as an OBJ file to get all the co-ordinates (OBJ is just a text file). Otherwise if you want to know the location of a certain point along an edge you might need to estimate it.
My usual shortcut is to cut the edge in question into say 10 sections then deselect the vertices near the point I want and delete the rest. Then I can cut that remaining edge until I get a vertex where I want it. It saves all that mucking about with trying to move a vertex along an edge that isn't planar to the X, Y or Z axes.
My usual shortcut is to cut the edge in question into say 10 sections then deselect the vertices near the point I want and delete the rest. Then I can cut that remaining edge until I get a vertex where I want it. It saves all that mucking about with trying to move a vertex along an edge that isn't planar to the X, Y or Z axes.
Re: texturing with Wings3d
I connect the edge with another one, and slide the connecting edge so that one end sits on the place I want coordinates of. Then I read that vertice's coordinates.Selezen wrote:You can export the model as an OBJ file to get all the co-ordinates (OBJ is just a text file). Otherwise if you want to know the location of a certain point along an edge you might need to estimate it.
My usual shortcut is to cut the edge in question into say 10 sections then deselect the vertices near the point I want and delete the rest. Then I can cut that remaining edge until I get a vertex where I want it. It saves all that mucking about with trying to move a vertex along an edge that isn't planar to the X, Y or Z axes.
...and keep it under lightspeed!
Friendliest Meteor Police that side of Riedquat
Far Arm ships
Z-ships
Baakili Far Trader
Tin of SPAM
Friendliest Meteor Police that side of Riedquat
-
maaarcooose

- ---- E L I T E ----
- Posts: 397
- Joined: Sun May 29, 2011 9:36 pm
- Location: Devon, UK
- Contact:
Re: texturing with Wings3d
I'm going to add my own tips here as I'm using a method mostly like Griffs recommendations but with some differences. I'm loving how easy Wings is to use.
1. First off I'm tending to work with only half the model and using a virtual mirror in Wings as that makes it easier and less surfaces to deal with. (Not sure if you can create a mirror after texturing though)
2. Select whole model and do 'UV Mapping'.
3. Line up so you've looking down the Z Axis and all the model is visible.
4. Right click, 'Segment by' -> 'Feature detection' or 'Projection'. Both do different things, but will require modification afterwards. I am tending to use 'Projection' and modifying.
5. All areas of the ship will now be coloured. These areas are how the various surfaces will be grouped and split apart. I tend to redo most of them so each section of coloured the same.
6. Select edges in the coloured areas as required and 'mark edges for cut'. If you section cleverly, you probably won't need to do this much, but I tend to do it for cylinder objects and group them together.
7. Select various faces that you want to regroup and right click and select a colour 'AuvChart#'
8. Once happy with the grouping and the cuts, hit 'Continue' -> 'Projection Normal'
9. You now have your map.
*** At this point, I'd really like to know how to be able to go back to the section selection and splitting as if I get it wrong, I always end up having to undo and redo all my selections. Gets a bit tedious on large models.
10. Create the texture, make external and edit as described earlier in the thread.
I've also found when selecting areas to mark, especially round things, it saves time to use the +/- selections. Select a whole section of model, mark with one colour. Hit - and mark as another, hit - again and mark another, etc...
I hope this makes sense.
!m!
Trading computers and writing stuff....
Website: http://www.theramist.co.uk/
OOliteInfo: http://www.theramist.co.uk/ooliteinfo/oo.php
Website: http://www.theramist.co.uk/
OOliteInfo: http://www.theramist.co.uk/ooliteinfo/oo.php
-
maaarcooose
- ---- E L I T E ----
- Posts: 397
- Joined: Sun May 29, 2011 9:36 pm
- Location: Devon, UK
- Contact:
Re: texturing with Wings3d
I've solved the going back to sectioning issue.
If you use different textures for all the areas you wish to section in the main modelling window these willbe used as the basic sections when you go to UV Mapping.
You can then skip the sectioning step, add in your cuts where required in the various sections and then Continue.
This means you save your sections in the main file.
!m!
Trading computers and writing stuff....
Website: http://www.theramist.co.uk/
OOliteInfo: http://www.theramist.co.uk/ooliteinfo/oo.php
Website: http://www.theramist.co.uk/
OOliteInfo: http://www.theramist.co.uk/ooliteinfo/oo.php
-
maaarcooose
- ---- E L I T E ----
- Posts: 397
- Joined: Sun May 29, 2011 9:36 pm
- Location: Devon, UK
- Contact:
Re: texturing with Wings3d
So what does it mean when you get:
Internal Error: badarith
When you hit Continue -> Unrapping.
!m!
Internal Error: badarith
When you hit Continue -> Unrapping.
!m!
Trading computers and writing stuff....
Website: http://www.theramist.co.uk/
OOliteInfo: http://www.theramist.co.uk/ooliteinfo/oo.php
Website: http://www.theramist.co.uk/
OOliteInfo: http://www.theramist.co.uk/ooliteinfo/oo.php