Join us at the Oolite Anniversary Party -- London, 7th July 2024, 1pm
More details in this thread.

The Seraphim - A custom Ship OXP from start to finish.

Discussion and information relevant to creating special missions, new ships, skins etc.

Moderators: winston, another_commander

Post Reply
User avatar
Scarecrow
Dangerous
Dangerous
Posts: 99
Joined: Fri Jan 09, 2009 9:21 am
Contact:

Post by Scarecrow »

Right then. Whist we were away...

I've broken the UV mapping on the Seraphim up into groups that are on a fairly similar plane and have logical mapping breaks, or unwrapped them if they need to be contiguous (in the case of cylinders for example).

Image

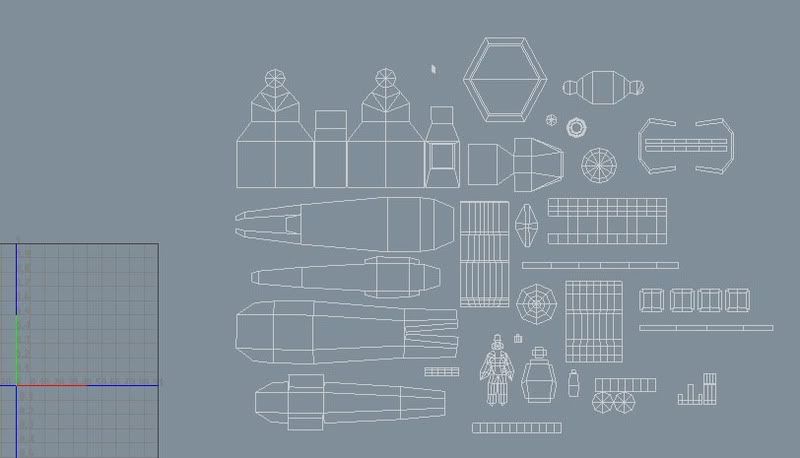
I apply a small (64x64) chequered texture to the model and then scale the individual UV groups until the chequers on the model are approximately the same size. This ensures that each group is more or less to scale and recieving it's fair share of pixels on the texture map.

[img]http://s31.photobucket%20.com/albums/c362/waynepeters/th_texture_layout.jpg[/img]

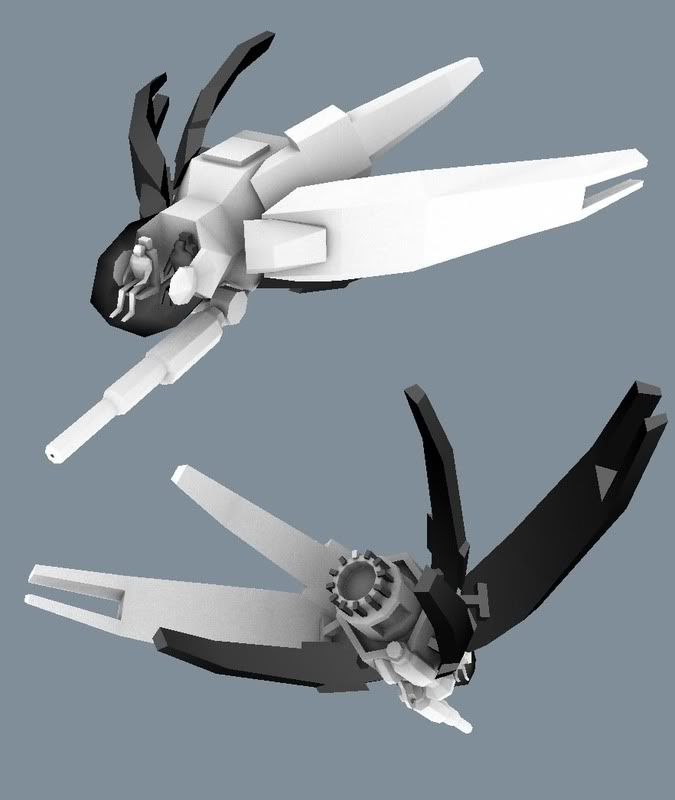
Note that only two of the six wings are textured and only one of the pilots. This is because I only need to map one of the large wings and one of the small wings. I can then mirror them to replace the other wings, as the ambient lighting and textures on them will be virtually identical. Equally, I only need to texture one pilot and duplicate him. The ambient lighting on the pilots would be slightly different, but not enough to warrant using up valuable texture space for a second pilot texture. I've done a similar thing with the lugs around the afterburner too which you can see in a later picture.
If there was going to be a signifigant difference in ambient lighting on the parts then it would be worth mapping them individually or it starts to look broken.

Once all my UV groups are to scale then I start to lay them out into a square, maximising the space used so that the texture on each part is as high res as possible and that there are as few pixels as possible loaded into memory that are not actually being used.
There are software plugins that will do this automatically for you, but I prefer to do it myself. I don't trust software to do it intelligently enough and it also means that I know exactly what each piece is and where it is. It can also be quite satisfying and theraputic - a bit like doing a jigsaw.

[img]http://s31.photobucket.com%20/albums/c362/waynepeters/th_UVs_Square.jpg[/img]

The two areas I've marked with an X are duplicated polys on the front of the big wing. This is so that I can mirror the big wing and still have the word 'POLICE' the right way round by swapping the mapping on the mirrored wing for this texture area.

Once this is done, I run an ambient occlusion pass. This is a groovy plugin for Maya that generates a texture based on the UV layout I've made, that has dark areas in recesses and light areas on exposed surfaces. This will form the basis of my texture and will provide subtle lighting variations that even the best real-time renderer cannot accomplish. Something else this does is provide faked in smoothing so if, like oolite, smoothing groups are not supported, there will be faked hard and smooth edges on the texture instead. It's not perfect (especially when combined with specularity) but it's better than nothing.

I usually work at 1024x1024 and then resize the final texture image.

[img]http://s31.photo%20bucket.com/albums/c362/waynepeters/th_Seraphim_Ambient_scr.jpg[/img]

Image

Crow
Senior Artist - Blitz Games
My other work
The Crow's Nest
User avatar
Frame
---- E L I T E ----
---- E L I T E ----
Posts: 1477
Joined: Fri Mar 30, 2007 8:32 am
Location: Witchspace

Post by Frame »

Nice design, however, as far as I know, Oolite does not support transparent textures... that cockpit would just be solid colour.
so does men and chair inside would just be wasted polygons...
Bounty Scanner
Number 935
User avatar
Scarecrow
Dangerous
Dangerous
Posts: 99
Joined: Fri Jan 09, 2009 9:21 am
Contact:

Post by Scarecrow »

That is absolutely true.
The cockpit is not transparent though, it is reversed polygons so it renders behind the pilots.
Senior Artist - Blitz Games
My other work
The Crow's Nest
User avatar
Cmdr Wyvern
---- E L I T E ----
---- E L I T E ----
Posts: 1649
Joined: Tue Apr 11, 2006 1:47 am
Location: Somewhere in the great starry void

Post by Cmdr Wyvern »

Semitransparent PNG images with alpha channels can, and has been used successfully in custom HUDs. As for alpha channeled, semitransparent PNGs being used successfully for other ingame objects, I havn't seen it done yet...
Nobody has really tried up to this point.

Give it a go, Crow. If it works, cool. If not, oh well, back to the drawing board.
Running Oolite buttery smooth & rock stable w/ tons of eyecandy oxps on:
ASUS Prime X370-A
Ryzen 5 1500X
16GB DDR4 3200MHZ
128GB NVMe M.2 SSD (Boot drive)
1TB Hybrid HDD (For software and games)
EVGA GTX-1070 SC
1080P Samsung large screen monitor
User avatar
JensAyton
Grand Admiral Emeritus
Posts: 6657
Joined: Sat Apr 02, 2005 2:43 pm
Location: Sweden
Contact:

Post by JensAyton »

Cmdr Wyvern wrote:
Semitransparent PNG images with alpha channels can, and has been used successfully in custom HUDs. As for alpha channeled, semitransparent PNGs being used successfully for other ingame objects, I havn't seen it done yet...
Nobody has really tried up to this point.
We’ve been over this. It explicitly does not work.
User avatar
Scarecrow
Dangerous
Dangerous
Posts: 99
Joined: Fri Jan 09, 2009 9:21 am
Contact:

Post by Scarecrow »

As Ahruman says, PNG alpha channels are simply not supported. They don't work. The reversed normal trick is old but still quite effective if you have nothing better.

Crow
Senior Artist - Blitz Games
My other work
The Crow's Nest
User avatar
Simon B
---- E L I T E ----
---- E L I T E ----
Posts: 836
Joined: Thu Oct 23, 2008 5:54 am
Location: Red Beach NZ
Contact:

Post by Simon B »

Interesting this emphasis on a single resolution throughout the skin. I have no such compulsions - and scale the different panels according to what is going to be put on them.

Panels which need a lot af detail get enlarged. Panels which will be largely hidden or in tight corners will be reduced.

I also don't worry so much about selecting out similar normals ... the texture smears out over corners if an adjacent panel has a radically different normal, and I can use that as part of the effect.

eg - every Noelite ship has the entire rear engine nozzle as a single uv-mapped panel. (The central exhaust it surrounds is separate, and enlarged!)

This provides a darkened/smoothed effect when I use the same pattern over it and the rest of the engine. Just what I need and reduces work. Observe:
Image

Also notice which sections have low-res texturing and which high.
This is a 512x512 over 1285 faces (before triangulation - counting the guns). The core ship has 542 faces - so I'll need to remove panels or just leave the engines as a subentity.

Darn - another set of tips for the skinners cove.

I would like to know how the reversed normal trick works out in the game?

I'd also like to know how to manage it in Wings 3D.

If you want to see that model in the game right away - do you know how to use sub-entities?
Simon Bridge
[re2dux] [neolite]
"Everything is perfect down to every last flaw..."
HBT: The Book of Verse - Principia Discordia
User avatar
Scarecrow
Dangerous
Dangerous
Posts: 99
Joined: Fri Jan 09, 2009 9:21 am
Contact:

Post by Scarecrow »

Simon B wrote:
Interesting this emphasis on a single resolution throughout the skin. I have no such compulsions - and scale the different panels according to what is going to be put on them.

Panels which need a lot af detail get enlarged. Panels which will be largely hidden or in tight corners will be reduced.
A fair point and I don't disagree with it. I do this out of habit. Mainly because a lot of the models I've worked on are intended to be viewed close-up.

I will, however sometimes make the more visible, more important areas slightly larger than the others, as you mentioned. A good example of what you're talking about is faces. Heads on a texture will often have more space and a higher res because they will be seen in closeup in cutscenes.
Simon B wrote:
I also don't worry so much about selecting out similar normals ... the texture smears out over corners if an adjacent panel has a radically different normal, and I can use that as part of the effect.
I'm not exactly shure what you mean by this, but if you mean the grouping of connected normals on a UV layout then I think it's just good practice. You don't get hard texture seems across poly surfaces and the model simply looks more highly polished. I've not known an art director yet that would tolerate texture seems, stretching, smearing or distortion. I'd have been sacked a long time ago :)


That's a really nice model and texture by the way. Can I see the texture itself and/or the UV layout.
Simon B wrote:
I would like to know how the reversed normal trick works out in the game?
Me too. It will work provided that Oolite does not draw double-sided polys. I was blown through Coriolis station at one point and normals facing away from me were not drawn - they were in effect invisible, so it appears that Oolite polys are only one sided, so it should be fine. We'll see.

I will try and drop the model into the game soo just to test the reversed normals. I do know about sub entities but I'll probably just do a test run with the model cut down to less than 500 polys - probably just the cockpit :)

Cheers,

Crow.
Senior Artist - Blitz Games
My other work
The Crow's Nest
User avatar
Scarecrow
Dangerous
Dangerous
Posts: 99
Joined: Fri Jan 09, 2009 9:21 am
Contact:

Post by Scarecrow »

Okay, here's my new dead end.

I exported the seraphim as an OBJ and dragged it onto the OBJ2DAT.PY script and it created a completely empty DAT file.

The command prompt did this:

Code: Select all

Microsoft Windows XP [Version 5.1.2600]
C:\>obj2dat.py police_seraphim.obj
converting...
['police_seraphim.obj']
police_seraphim.obj->police_seraphim.dat
going to open material library file: police_seraphim.mtl
Material Police_Seraphim -> C:/seraphim.png
done
The obj, mtl, png and script files were all in the same folder (root of C to keep things simple).

The model is nearly 1800 polys. However, whilst I know that won;t work in the game, I didn't think the converter script had any restrictions.

<EDIT> I just tried converting a cube - 12 triangles - with the viper_redux.png applied to it and that failed too so it's not the poly/vertex count or the png file! </EDIT>

What gives?
Senior Artist - Blitz Games
My other work
The Crow's Nest
User avatar
Griff
Oolite 2 Art Director
Posts: 2479
Joined: Fri Jul 14, 2006 12:29 pm
Location: Probably hugging his Air Fryer

Post by Griff »

i sometimes get these empty dats too, i usually end up re-exporting the obj and trying again.
do you have wings3d on your pc? i always export my models out of lightwave into wings3d then export them again out of wings3d as an obj. i noticed that obj files from lightwave are different from wings3d ones, i'm clutching at straws, but maybe the script has a problem with obj's straight out of maya?
User avatar
Scarecrow
Dangerous
Dangerous
Posts: 99
Joined: Fri Jan 09, 2009 9:21 am
Contact:

Post by Scarecrow »

That would be my guess. I'll try going via Wings3D.
Senior Artist - Blitz Games
My other work
The Crow's Nest
User avatar
JensAyton
Grand Admiral Emeritus
Posts: 6657
Joined: Sat Apr 02, 2005 2:43 pm
Location: Sweden
Contact:

Post by JensAyton »

If you continue to have problems, e-mail me the problematic Objs (see sig).
User avatar
Pangloss
---- E L I T E ----
---- E L I T E ----
Posts: 303
Joined: Wed Dec 13, 2006 5:57 pm
Location: Scranton, PA (via Stevenage, Herts)

Post by Pangloss »

Just came in to give the Kiwi some kudos. These ships are INCREDIBLE, Simon B. Do you have any as OXPs yet?
"All is for the best in this best of all possible worlds..."
Dr.Pangloss, Voltaire's 'Candide'.

Image
User avatar
Simon B
---- E L I T E ----
---- E L I T E ----
Posts: 836
Joined: Thu Oct 23, 2008 5:54 am
Location: Red Beach NZ
Contact:

Post by Simon B »

Scarecrow wrote:
I will, however sometimes make the more visible, more important areas slightly larger than the others, as you mentioned. A good example of what you're talking about is faces. Heads on a texture will often have more space and a higher res because they will be seen in closeup in cutscenes.
Really? I just use different models ... though you sometimes want a continuous zoom - no cuts.

Still - just like the old solid model days, you can just build the sets you need to, keeping the detail level a notch higher than required.

For a movie
Simon B wrote:
I also don't worry so much about selecting out similar normals
I'm not exactly sure what you mean by this, but if you mean the grouping of connected normals on a UV layout then I think it's just good practice.[/quote]No - at the initial uv-map, when you are selecting contiguous, projected, regions to form single objects to be grouped on the map. (Help! I have the skills but not the vocabulary gods damn it!)
That's a really nice model and texture by the way. Can I see the texture itself and/or the UV layout.
The smears on that get past the art director right?

All the "Neolite Concepts" textures are in the Neolites OXP ... except that one :) I'll have to post it to you - though it will be up in about a week.

Heyy... I'll swap you for a human model. I need a low-poly guy in a space-suit so the fighters can have ejector seats.
Simon Bridge
[re2dux] [neolite]
"Everything is perfect down to every last flaw..."
HBT: The Book of Verse - Principia Discordia
User avatar
Scarecrow
Dangerous
Dangerous
Posts: 99
Joined: Fri Jan 09, 2009 9:21 am
Contact:

Post by Scarecrow »

Here's a quick WiP of the Seraphim. I'm about half way through the diffuse map. Note that there is no lighting or fancy render effects on this model now. Everything you see is being done by the diffuse/colour map.

Image

I've included the diffuse map here aswell. This is sized to 512x512 which is the size I want it to be when finished. The working file, however is 1024x1024.

Image

Crow
Senior Artist - Blitz Games
My other work
The Crow's Nest
Post Reply