Blender 3d Modeling Tutorials
Moderators: another_commander, winston
Re: Blender 3d Modeling Tutorials
I thought I was getting the hang of Blender, at least I was able to create a few test ships for practice. When I thought I had it down well enough, I decided to go ahead and try to take it to the next level by texture painting it. I spent the whole evening painting, and trying to make it look how I wanted, and then I clicked "File", and "Save", as I have always done. I was going to post the results up on the board you mentioned earlier in this tutorial. I guess I don't quite have it down yet, because when I went to get what I had saved, all that painting I did was gone. The ship was just how it was right before I started painting, right along with the unwrapped version below. I took a screen shot to show you.
http://img854.imageshack.us/img854/4470/sunbatblend.png
I'm missing something crucial in saving my work, and I can't seem to figure out what it is. I have checked your tutorial a couple of times, and it seems like I have followed your instructions, but the final result is not being saved. Would you please tell me what I need to do to save my work after the texture painting step? I truly appreciate all your help.
- Staer9
- ---- E L I T E ----

- Posts: 570
- Joined: Fri Feb 18, 2011 4:53 pm
- Location: Hatfield, Hertfordshire (poor industrial)
Re: Blender 3d Modeling Tutorials
In the texture window you should click "image > pack image" this means that the texture is saved in the .blend file (of course when you export it as an obj you also have to export the texture)
Sorry for not including this in the tutorial
updating it now...
Sorry for not including this in the tutorial
updating it now...

Re: Blender 3d Modeling Tutorials
No sweat, I appreciate the help. I think I got it packed now. What is the procedure for exporting both the packed image, and the .blend image?Staer9 wrote:In the texture window you should click "image > pack image" this means that the texture is saved in the .blend file (of course when you export it as an obj you also have to export the texture)
Sorry for not including this in the tutorial
updating it now...
- Staer9
- ---- E L I T E ----

- Posts: 570
- Joined: Fri Feb 18, 2011 4:53 pm
- Location: Hatfield, Hertfordshire (poor industrial)
Re: Blender 3d Modeling Tutorials
Exporting and converting for Oolite
When you have finished the texture go to "image > save a copy" in the image editor window, then choose where to save it.
IMPORTANT: always make sure you add the .png suffix to the name
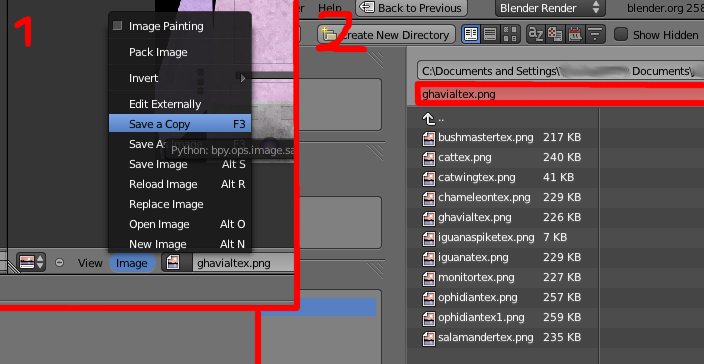
Thats the texture sorted... now the model:
Go to "file > export > wavefront .obj"
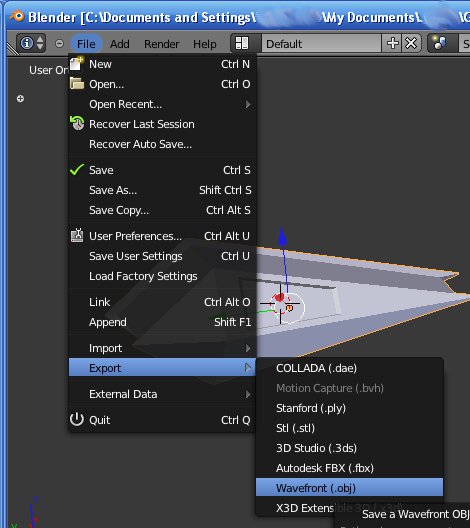
choose where to save it.
Go to the folder where you saved the .obj, you should also have a .mtl file, DON'T DELETE IT!
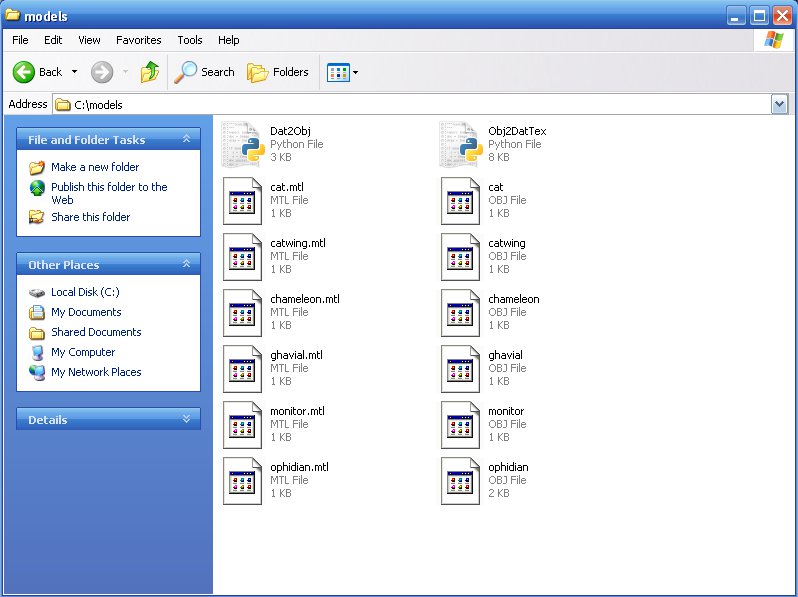
Get the Obj2DatTex.py thingy and Python 2.6
Now run command prompt, first navigate to the folder where you saved the .obj file (you should also put the Obj2DatTex.py there as well)
When you are at the folder type: "Obj2DatTex.py yourshipname.obj"
then press enter.
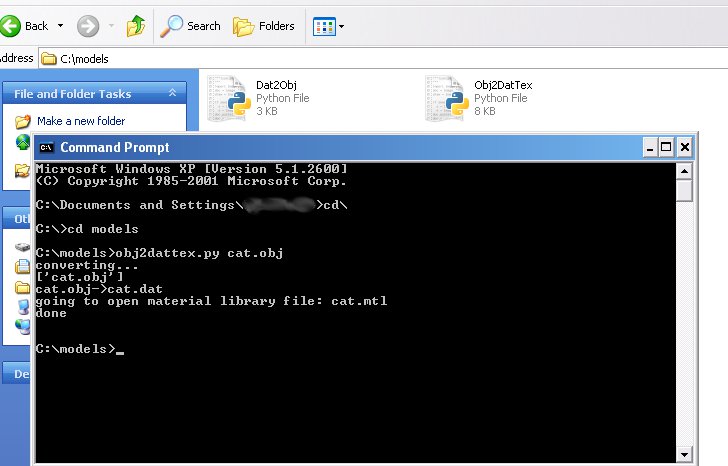
if no errors occured you should have a screen like the one above ^, and there should also be a .dat model in your folder.
This is all you need from blender for a ship OXP.
When you have finished the texture go to "image > save a copy" in the image editor window, then choose where to save it.
IMPORTANT: always make sure you add the .png suffix to the name

Thats the texture sorted... now the model:
Go to "file > export > wavefront .obj"

choose where to save it.
Go to the folder where you saved the .obj, you should also have a .mtl file, DON'T DELETE IT!

Get the Obj2DatTex.py thingy and Python 2.6
Now run command prompt, first navigate to the folder where you saved the .obj file (you should also put the Obj2DatTex.py there as well)
When you are at the folder type: "Obj2DatTex.py yourshipname.obj"
then press enter.

if no errors occured you should have a screen like the one above ^, and there should also be a .dat model in your folder.
This is all you need from blender for a ship OXP.

-
Cmdr Vault
- Average

- Posts: 15
- Joined: Wed Aug 31, 2011 8:28 pm
Re: Blender 3d Modeling Tutorials
Hello Staer9Yes, that problem is a common one, the best thing to do is scale it down in object mode (NOT edit mode) this reduces the size it appears in blender, but not its actual size, scaling in edit mode reduces actual size.
thus you can scale down large dockables in object mode to make them easier to work on, then when finished you can still export as an Obj file using the actual co-ords
If this makes any sense, then great!
I'll also start work on a "making dockables" tutorial which will go into it at quite some detail.
I have tried it that way now:
- Resized the model to the size I like it in edit mode.
- Switched to object mode an made it smaller again.
- Exported it as *.obj and converted it to a *.dat file
If I export the *.dat while i have the large model, the sizes in the *.dat are correct, but I can not unwrap the model in this view correctly.
Greetings,
Cmdr Vault.
-
Cmdr Vault
- Average

- Posts: 15
- Joined: Wed Aug 31, 2011 8:28 pm
Re: Blender 3d Modeling Tutorials
Hi All,
another problem I have, is the station is rotating around the wrong axis. Can I change this by rotating the model in Blender?
Bye,
Commander Vault
another problem I have, is the station is rotating around the wrong axis. Can I change this by rotating the model in Blender?
Bye,
Commander Vault
Re: Blender 3d Modeling Tutorials
Ok, I've got two questions. First, how does one go about unwrapping their 3D Blender model without using the Smart Project? Mine is just not unwrapping in a way that I can work with. That's especially frustrating to me, as I thought I had this particular ship all sealed up at the seams, and vertices, and had all the sides in a mathematically correct balance. Evidently not, as it is unwrapping into an overlapping mess of which I can't make head, or tail, which therefore makes it impossible to paint. I had it all done at one point, until I read that in order for the Oolite computer game to recognize a laser, one has to have a flattened end, with it's own face, as the computer will ignore it if it is a point. That is when my unwrapping troubles started. Oh, I was able to create the laser with it's own face and everything, but evidently in doing so I somehow tangle the original mesh up so bad, that it couldn't unwrap as neatly as it did at first. I don't know, maybe I'll just have to start again from scratch. 
Next question. You said that the Blender tutorial would tell me how to go about figuring out the X, Y, and Z numbers needed to create exterior views, and laser placement, and missile placement, etc... I can't find where you covered it. The last thing I found in the tutorial was how to make sure the unwrap.png would be sure to link to the actual wrapped model. Oh, and I guess you added the little bit about how to export the model, but I can't find anything in any detail on the X, Y, Z equations, and how they are applied. Am I missing something? Please be sure to understand that I'm not in the least upset about anything, but very much appreciate all of your help. Without your tutorial, I wouldn't have even been able to begin a ship in Blender, so thanks very much.
Next question. You said that the Blender tutorial would tell me how to go about figuring out the X, Y, and Z numbers needed to create exterior views, and laser placement, and missile placement, etc... I can't find where you covered it. The last thing I found in the tutorial was how to make sure the unwrap.png would be sure to link to the actual wrapped model. Oh, and I guess you added the little bit about how to export the model, but I can't find anything in any detail on the X, Y, Z equations, and how they are applied. Am I missing something? Please be sure to understand that I'm not in the least upset about anything, but very much appreciate all of your help. Without your tutorial, I wouldn't have even been able to begin a ship in Blender, so thanks very much.
Re: Blender 3d Modeling Tutorials
Another question, but this time concerning the way to bring up the "Background View". My version of Blender is nothing like the pictures in those tutorials you pointed out to me. For one thing, down in the left bottom corner, where the "Editor Type" is chosen, the tutorial pictures show some kind of mesh, or graph, which the version I use does not have. I'm wondering if THAT is the reason I can't find the "Background View" setting. Do you know anything more about this? I appreciate the help.Staer9 wrote:http://www.blenderguru.com/whered-that-button-gomandoman wrote:Sorry to come right back again like this, but I've hit a snag. One of the steps in the Blueprint tutorial was to click on view, and then select Background, except the version of Blender I have doesn't have that option in the View menu. The tutorial didn't give me any alternatives, either. Is that a really important step, or could I just go on without it?
just scroll down the page a little
- Staer9
- ---- E L I T E ----

- Posts: 570
- Joined: Fri Feb 18, 2011 4:53 pm
- Location: Hatfield, Hertfordshire (poor industrial)
Re: Blender 3d Modeling Tutorials
Cmdr Vault wrote:I have tried it that way now:
Unfortunately it did not work. The dat file still shows the small size.
- Resized the model to the size I like it in edit mode.
- Switched to object mode an made it smaller again.
- Exported it as *.obj and converted it to a *.dat file
If I export the *.dat while i have the large model, the sizes in the *.dat are correct, but I can not unwrap the model in this view correctly.
- first create a rough model the actual size you want, don't worry if bits dissapear
- in Object Mode = scale the model down so no bits dissapear
- in Edit Mode = add any bits of trim or more complex parts that were too difficult to do before
- set up the texture and any other things you have left to do
- in Object Mode = press "n" to get a side menu
- in That-Side-Menu-Thingy = scroll down to the transform tab, if it isn't open then open it
- in the transfrom tab scroll down a little more until you reach the "scale" bit, change all values to 1.000
- your model should return to the size it was and is now ready to be exported
quite simply: YesCmdr Vault wrote:another problem I have, is the station is rotating around the wrong axis. Can I change this by rotating the model in Blender?
Problem number 3
- select a group of faces (for example the ones on the top of the model)
- press "u" for the unwrap menu
- click "project from veiw"
- repeat with the remaining faces, but remember to change the veiw so you are looking at the faces head-on
First, what version of blender are you using?

-
Cmdr Vault
- Average

- Posts: 15
- Joined: Wed Aug 31, 2011 8:28 pm
Re: Blender 3d Modeling Tutorials
Thanks for the help!
I now have a station in a good size and rotating around the correct axis.
I started to create the skin and noticed that I can look through some walls of the station. I can look through some parts of the hull of the station and see the inner side of the opposite hull. Is there something wrong with my UV map?
Bye,
Commander Vault
- Staer9
- ---- E L I T E ----

- Posts: 570
- Joined: Fri Feb 18, 2011 4:53 pm
- Location: Hatfield, Hertfordshire (poor industrial)
Re: Blender 3d Modeling Tutorials
There are two possibilities:
1) the normals are messed up
2) the station is confusing the game
To know which you will need to post a screeny (not that there is anything wrong with that )
)
1) the normals are messed up
2) the station is confusing the game
To know which you will need to post a screeny (not that there is anything wrong with that

-
Cmdr Vault
- Average

- Posts: 15
- Joined: Wed Aug 31, 2011 8:28 pm
Re: Blender 3d Modeling Tutorials
There it is:

I have colored it yellow to see it better - it won't stay like this
You can see a ship flying through the station in direction exit. The outer walls in direction player are missing, the ones in the back are visible.
Bye,
Cmdr Vault

I have colored it yellow to see it better - it won't stay like this
You can see a ship flying through the station in direction exit. The outer walls in direction player are missing, the ones in the back are visible.
Bye,
Cmdr Vault
- DaddyHoggy
- Intergalactic Spam Assassin

- Posts: 8515
- Joined: Tue Dec 05, 2006 9:43 pm
- Location: Newbury, UK
- Contact:
Re: Blender 3d Modeling Tutorials
That looks like flipped normals to me - since the missing bits don't appear to be culled due to drawing distance.
Oolite Life is now revealed hereSelezen wrote:Apparently I was having a DaddyHoggy moment.
Re: Blender 3d Modeling Tutorials
Did you try solidifying the faces on the missing walls? I'm no expert, but I've used that technique more than once with decent results.Cmdr Vault wrote:I have colored it yellow to see it better - it won't stay like this
You can see a ship flying through the station in direction exit. The outer walls in direction player are missing, the ones in the back are visible.
Bye,
Cmdr Vault
- Staer9
- ---- E L I T E ----

- Posts: 570
- Joined: Fri Feb 18, 2011 4:53 pm
- Location: Hatfield, Hertfordshire (poor industrial)
Re: Blender 3d Modeling Tutorials
Fixing normals and general tidying
1) press "t" in the 3d window, a new box should appear on the left (lets call it the transform window)
2) in the transform window click "remove doubles" (this fixes non-manifold meshes, enabling the recalculate script)
3) then click "recalculate" (this fixes the normals in your model, but only of it is a manifold mesh)
4) just to be on the safe side, go to "object data" in the properties window and tick "double sided"]

