I was PMing around the other day, and someone mentioned that we should have a cove for people that can't do models or write code... but they can do artwork. So I thought we could all show how to do certain things in PhotoShop, GIMP, or whatever other software you have.
First: GIMP. GIMP is like PhotoShop, but free. It's as complex, but it was created by some magnificent clever peeps that thought "oi, I could write a program that does what Photoshop does". So they did. In the same way we're all chipping in designs for Oolite (and that's free too).
For those of you that bought a printer or scanner, and it came with a free copy of Photoshop Elements (or if your computer is older, it was called PhotoDeluxe), that software is just what you need. Slightly easier to use than Photoshop or GIMP, and it does the same kind of thing for our needs. So if you never installed that particular program, or it's unused on your hard drive, now's the time to fire it up.
The reason we use these programs? They make pictures in Layers. Think of an old-fashioned cartoon, where Bugs Bunny in the foreground was animated at 12 frames a second on a clear film but the background was a still image. All we're doing to 'skin' a ship is to create a single frame... but we can put some objects in front of others, and change the layer beneath without altering the other layers.
Coming next: how to make a brushed metal effect, really easily.
Skinner’s Den
Moderators: another_commander, winston
-
Pangloss

- ---- E L I T E ----

- Posts: 303
- Joined: Wed Dec 13, 2006 5:57 pm
- Location: Scranton, PA (via Stevenage, Herts)
Skinner’s Den
Last edited by Pangloss on Tue Jan 13, 2009 6:16 pm, edited 1 time in total.
"All is for the best in this best of all possible worlds..."
Dr.Pangloss, Voltaire's 'Candide'.

Dr.Pangloss, Voltaire's 'Candide'.


Okay, I'll jump in.
If you're using Photoshop, PaintShop Pro or Gimp:
For noise, do not, repeat, DO NOT use the 'noise' filter.
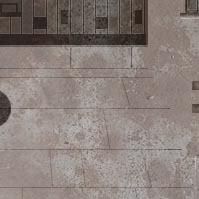
Get yourself a nice photo of some concrete, rust or dirt, place it over your texture as a new layer and set the layer type to 'soft light'. Adjust the opacity and saturation if necessary.
This...
plus this (set to 'soft light' and -60 saturation)...
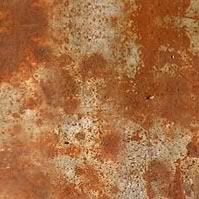
equals this...
Crow
If you're using Photoshop, PaintShop Pro or Gimp:
For noise, do not, repeat, DO NOT use the 'noise' filter.
Get yourself a nice photo of some concrete, rust or dirt, place it over your texture as a new layer and set the layer type to 'soft light'. Adjust the opacity and saturation if necessary.
This...
plus this (set to 'soft light' and -60 saturation)...
equals this...
Crow
-
Pangloss
- ---- E L I T E ----
- Posts: 303
- Joined: Wed Dec 13, 2006 5:57 pm
- Location: Scranton, PA (via Stevenage, Herts)
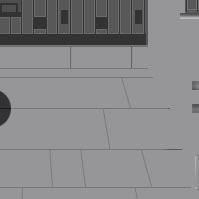
Nice one, Scarecrow... but in this instance, I'll show how a beginner can use noise to give a nice brushed metal look.
1 - I just made a simple image. For beginners, you'll see two Layers at the bottom right. The multi-coloured butterflies on the bottom, and an unfolded Krait ship on top.
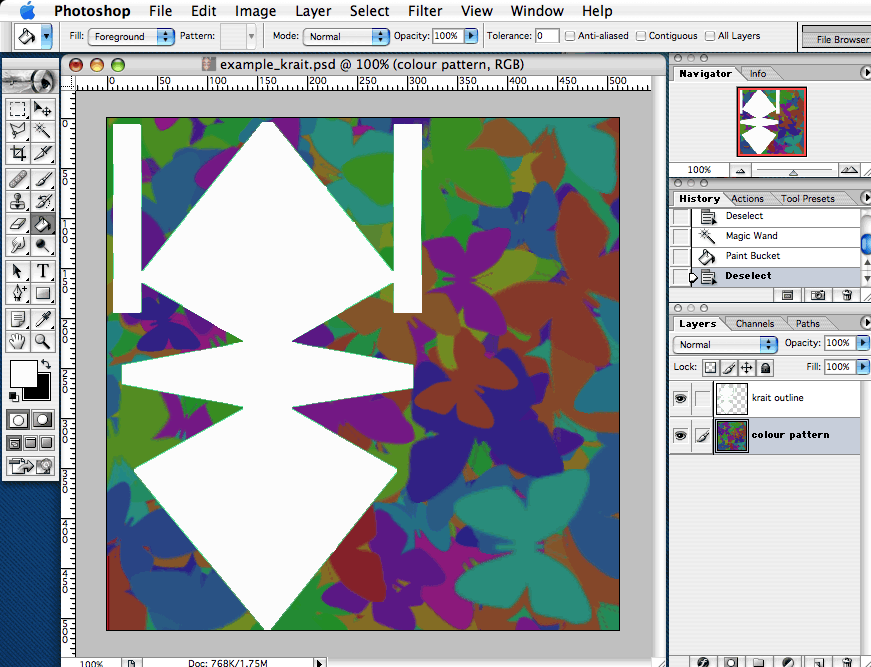
2 - add the noise.
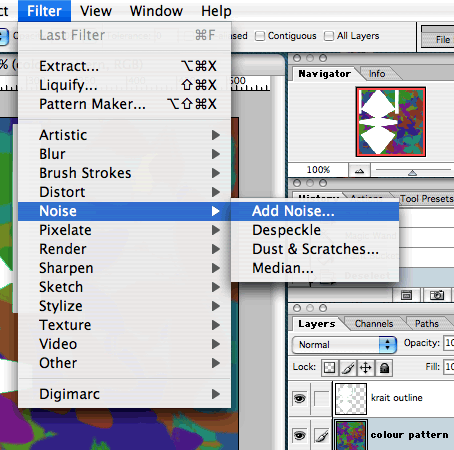
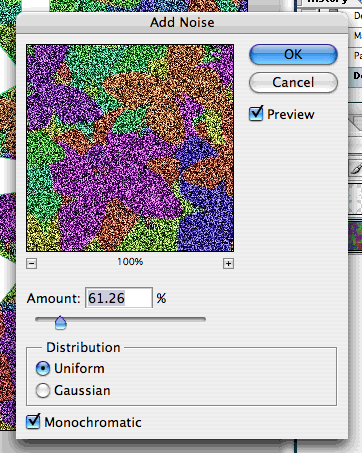
3 - as you see, I did this with the "colour pattern" Layer selected. I left the noise as monochrome, so it just added black specks to the psychadelic shades.
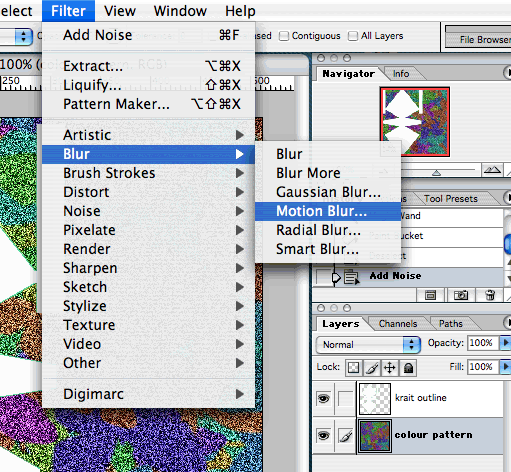
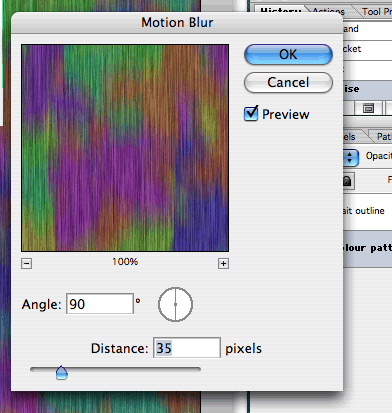
4 - now we have a 'noisy' texture, let's streak it out using Motion Blur.
5 - now you see how it looks like brushed metal. I wouldn't recommend using these colours (I usually use shades of grey and blue myself to get a polished stainless steel look).
6 - Now we have the texture, we're going to trim that bottom Layer so it's the same shape as the top. You don't NEED to do this (the program wraps the texture around the shape if there's extra stuff on the pattern or not) but it's good to know what the shape of the ship is (so you can position a cockpit layer, and an engine layer, and a rusty spots layer etc.)...
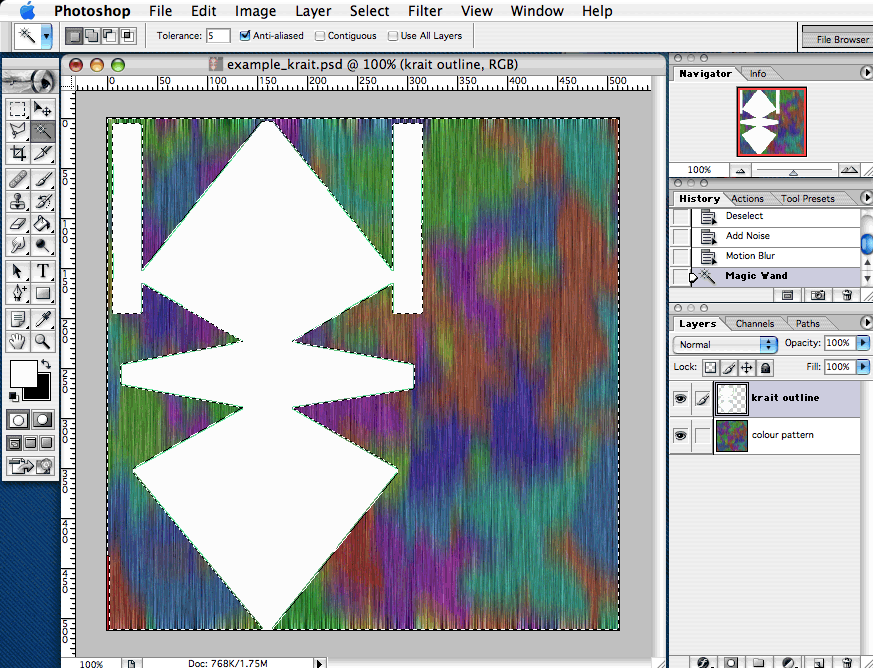
...you see how I have the TOP layer (the template) selected? I use the Magic Wand icon on the left and I have selected ON THE KRAIT OUTLINE LAYER the bits that AREN"T the white of the ship. There are other ways of doing this in PhotoShop, but this is just for beginners (ones that have PhotoDeluxe too).
7 - now, with that area flashing, I select the colour pattern layer and THEN I hit my Delete key!
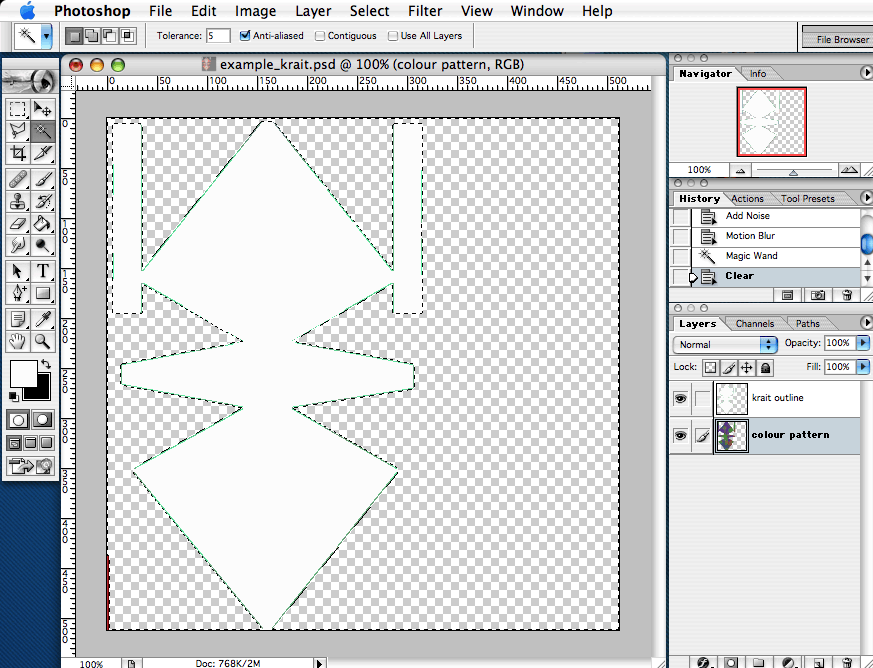
Hey, where'd the pattern go? Look at the right of the image. You see how we have two ship-shapes now? White now on top, coloured underneath!
8 - I click on the "eye" of the white layer (so I can't see it anymore) and there it is.
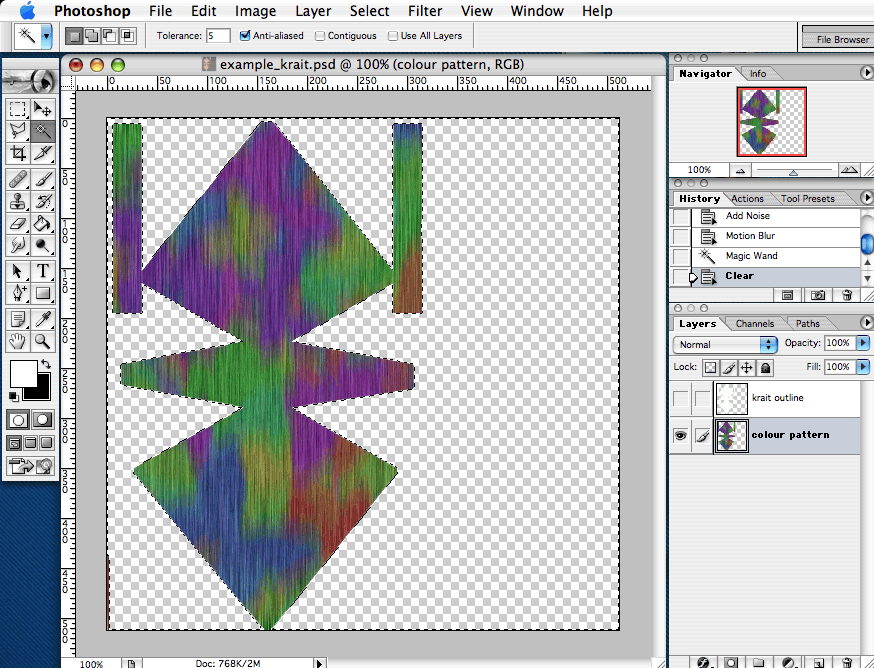
You can now add a cockpit layer, engine layer, etc.
Here's one I did using other techniques. The middle part was done using this technique on a grey colour (plus other techniques).

1 - I just made a simple image. For beginners, you'll see two Layers at the bottom right. The multi-coloured butterflies on the bottom, and an unfolded Krait ship on top.
2 - add the noise.
3 - as you see, I did this with the "colour pattern" Layer selected. I left the noise as monochrome, so it just added black specks to the psychadelic shades.
4 - now we have a 'noisy' texture, let's streak it out using Motion Blur.
5 - now you see how it looks like brushed metal. I wouldn't recommend using these colours (I usually use shades of grey and blue myself to get a polished stainless steel look).
6 - Now we have the texture, we're going to trim that bottom Layer so it's the same shape as the top. You don't NEED to do this (the program wraps the texture around the shape if there's extra stuff on the pattern or not) but it's good to know what the shape of the ship is (so you can position a cockpit layer, and an engine layer, and a rusty spots layer etc.)...
...you see how I have the TOP layer (the template) selected? I use the Magic Wand icon on the left and I have selected ON THE KRAIT OUTLINE LAYER the bits that AREN"T the white of the ship. There are other ways of doing this in PhotoShop, but this is just for beginners (ones that have PhotoDeluxe too).
7 - now, with that area flashing, I select the colour pattern layer and THEN I hit my Delete key!
Hey, where'd the pattern go? Look at the right of the image. You see how we have two ship-shapes now? White now on top, coloured underneath!
8 - I click on the "eye" of the white layer (so I can't see it anymore) and there it is.
You can now add a cockpit layer, engine layer, etc.
Here's one I did using other techniques. The middle part was done using this technique on a grey colour (plus other techniques).
Last edited by Pangloss on Thu Mar 10, 2011 2:24 am, edited 1 time in total.
"All is for the best in this best of all possible worlds..."
Dr.Pangloss, Voltaire's 'Candide'.
Dr.Pangloss, Voltaire's 'Candide'.
-
Captain Hesperus

- Grand High Clock-Tower Poobah

- Posts: 2310
- Joined: Tue Sep 19, 2006 1:10 pm
- Location: Anywhere I can sell Trumbles.....

-
Pangloss
- ---- E L I T E ----
- Posts: 303
- Joined: Wed Dec 13, 2006 5:57 pm
- Location: Scranton, PA (via Stevenage, Herts)
Agreed. Sounds like something in Grange Hill in the 1970s. No, wait, that was Tucker. Skinner's the man in The Simpsons.Captain Hesperus wrote:Nice work, Pangloss.
I think that Texture-Mapper's Cove doesn't quite trip off the tongue. Considering that you are adding skins to ships and other objects, I think that Skinner's Den would be more appropriate.....
Captain Hesperus
"All is for the best in this best of all possible worlds..."
Dr.Pangloss, Voltaire's 'Candide'.
Dr.Pangloss, Voltaire's 'Candide'.


-
Captain Hesperus
- Grand High Clock-Tower Poobah
- Posts: 2310
- Joined: Tue Sep 19, 2006 1:10 pm
- Location: Anywhere I can sell Trumbles.....
-
JensAyton

- Grand Admiral Emeritus

- Posts: 6657
- Joined: Sat Apr 02, 2005 2:43 pm
- Location: Sweden
- Contact:
I actually recommend not doing this. If you do, you should expand the selection (Select->Modify->Expand… in Photoshop) by at least four pixels first.Pangloss wrote:6 - Now we have the texture, we're going to trim that bottom Layer so it's the same shape as the top. You don't NEED to do this (the program wraps the texture around the shape if there's extra stuff on the pattern or not) but it's good to know what the shape of the ship is (so you can position a cockpit layer, and an engine layer, and a rusty spots layer etc.)...
The reason for this is that when the ship is too far away to use all the pixels in your texture, a lower-resolution version will be sampled instead (this is known as MIP mapping). The downscaling can cause colour to “bleed” over the edge of your polygons.
For the same reason, you should always have several pixels of padding between areas of the texture used for disjoint polygons with significantly different colours.
E-mail: [email protected]
-
Pangloss
- ---- E L I T E ----
- Posts: 303
- Joined: Wed Dec 13, 2006 5:57 pm
- Location: Scranton, PA (via Stevenage, Herts)
Good suggestion... I think the template I was using for the ship is slightly larger than the actual texture needed, so in the great scheme of things it looks OK. But you can never be too careful.Ahruman wrote:I actually recommend not doing this. If you do, you should expand the selection (Select->Modify->Expand… in Photoshop) by at least four pixels first.Pangloss wrote:6 - Now we have the texture, we're going to trim that bottom Layer so it's the same shape as the top. You don't NEED to do this (the program wraps the texture around the shape if there's extra stuff on the pattern or not) but it's good to know what the shape of the ship is (so you can position a cockpit layer, and an engine layer, and a rusty spots layer etc.)...
The reason for this is that when the ship is too far away to use all the pixels in your texture, a lower-resolution version will be sampled instead (this is known as MIP mapping). The downscaling can cause colour to “bleed” over the edge of your polygons.
For the same reason, you should always have several pixels of padding between areas of the texture used for disjoint polygons with significantly different colours.
"All is for the best in this best of all possible worlds..."
Dr.Pangloss, Voltaire's 'Candide'.
Dr.Pangloss, Voltaire's 'Candide'.
-
Simon B

- ---- E L I T E ----
- Posts: 836
- Joined: Thu Oct 23, 2008 5:54 am
- Location: Red Beach NZ
- Contact:
Some folk have been watching my Neolite attempts - I thought I'd share a trick:
Professionals can spend a lot of labour getting worn-effects on "metal" panels - this usually means airbrushing the centers or somesuch, and applying grungy textures to the edges.
That's more work than I am prepared to do for this game, where most of the ships will be seen only from wayy off, or moving quickly while attacking you.
There's a short-cut. But first - the preliminary ... you all know to do this right?
1. Get a UV map with edges.
When the model is complete - actually delete edges ... leave the minimum needed for the model to hold it's shape. Don't remove any vertices.
Do the mapping as usual - this will give you a png file with the main panel edges showing. Make sure you create a backup!
2. Create an edge layer. Open the original in GIMP (or whatever - menu stuff below will be GIMP-specific, I've never used Photoshop.) GIMP will call it "Background". Duplicate it - rename the dupe "edges" then make all the white bit transparent from the layers menu. Keep this layer an top.
This also keeps a backup handy as the "background". Keep this at the bottom, it's there is case you make a mistake.
3. Create another layer below the edge one - this is for your basic colors. Use the bucket fill tool to block in the colors.
I have a preference to put a textured layer below this one, and set the mode to grain merge. Other people like multiply or overlay ... play with the modes and layer order to suit.
All the neolite textures use a solid color layer above a light-metal texture (the one from the source in fact) above a dark metal texture (also from the source).
I'll call them color, lmetal and dmetal.
The color layer is grain-merged. The other two are normal.
Lmetal is chopped up to allow dmetal bits through where needed - I use it for engines for eg. (The UV map has been rigged so different color sections are positioned separately. As well as the scaling/sampling issue mentioned, it makes colouring within the lines trivial.)
4. Use the layers!
Make a habit of doing each new thing in a different layer - yes, it's a pain keeping them straight, so also name them things you'll recognize.
5. Use the edges layer to highlight the edges ...
This can be done by gauss-blurring the layer... for a typical 512x512 skin a blur to 7-8px is usually plenty. Duplicate the layer to make the effect more pronounced, or set the mode and use transparency.
To have light edges, invert the color. Use the colorize tools and play with the modes for interesting effects.
The neolite ships just keep this layer black, mode=grain-merge and opacity is normally 75% ... but darker areas often need a double layer and hi-res areas need less.
6. Use the edges layer to alter the interior color.
Sayyy what?!
Each major flat in the neolite textures starts dark in the middle, grades to lighter towards the edges, then you get the dark "burn" lines.
6a. duplicate the color layer - set the mode to "normal".
6b. add a new layer below - pick out a color from the metal layer, I used #858585 and bucket-fill the entire layer.
6c merge these two layers - call the result "aging".
This will look pretty ugly and it gets worse before it gets better.
6d duplicate the edges layer - invert the color (so it's white) and move it dawn till its above the aging layer.
6e gauss-blur to 5px - duplicate
6f gauss-blur the dupe to 10px - duplicate
6g repeat, to 20px
I usually have to duplicate that last one since it will be pretty faint and you'll want the spread to show up.
The smaller panel areas will now be completely white, but you'll still see some darker color in the middle of the bigger panels. Get the idea?
Merge all these (step 6) layers down to the "aging" layer.
6h make the white areas transparent!
Bingo!
Adjust the mode and opacity of the aging and color layers to taste.
If you remove the paint layer completely, then you get the effect of having paint worn off the edges ... gradually increase opacity of the color layer to get the right amount of wear. I've usually had good results with 75% color and 50% aging both grain-merged against that lmetal layer.
The effect can be quite subtle - I think it is well illustrated by this:

I've seen tutorials which involve hours of work for this effect - OK, a superior version of this effect on ultra-hi-res textures... hopefully this saves some labour.
Professionals can spend a lot of labour getting worn-effects on "metal" panels - this usually means airbrushing the centers or somesuch, and applying grungy textures to the edges.
That's more work than I am prepared to do for this game, where most of the ships will be seen only from wayy off, or moving quickly while attacking you.
There's a short-cut. But first - the preliminary ... you all know to do this right?
1. Get a UV map with edges.
When the model is complete - actually delete edges ... leave the minimum needed for the model to hold it's shape. Don't remove any vertices.
Do the mapping as usual - this will give you a png file with the main panel edges showing. Make sure you create a backup!
2. Create an edge layer. Open the original in GIMP (or whatever - menu stuff below will be GIMP-specific, I've never used Photoshop.) GIMP will call it "Background". Duplicate it - rename the dupe "edges" then make all the white bit transparent from the layers menu. Keep this layer an top.
This also keeps a backup handy as the "background". Keep this at the bottom, it's there is case you make a mistake.
3. Create another layer below the edge one - this is for your basic colors. Use the bucket fill tool to block in the colors.
I have a preference to put a textured layer below this one, and set the mode to grain merge. Other people like multiply or overlay ... play with the modes and layer order to suit.
All the neolite textures use a solid color layer above a light-metal texture (the one from the source in fact) above a dark metal texture (also from the source).
I'll call them color, lmetal and dmetal.
The color layer is grain-merged. The other two are normal.
Lmetal is chopped up to allow dmetal bits through where needed - I use it for engines for eg. (The UV map has been rigged so different color sections are positioned separately. As well as the scaling/sampling issue mentioned, it makes colouring within the lines trivial.)
4. Use the layers!
Make a habit of doing each new thing in a different layer - yes, it's a pain keeping them straight, so also name them things you'll recognize.
5. Use the edges layer to highlight the edges ...
This can be done by gauss-blurring the layer... for a typical 512x512 skin a blur to 7-8px is usually plenty. Duplicate the layer to make the effect more pronounced, or set the mode and use transparency.
To have light edges, invert the color. Use the colorize tools and play with the modes for interesting effects.
The neolite ships just keep this layer black, mode=grain-merge and opacity is normally 75% ... but darker areas often need a double layer and hi-res areas need less.
6. Use the edges layer to alter the interior color.
Sayyy what?!
Each major flat in the neolite textures starts dark in the middle, grades to lighter towards the edges, then you get the dark "burn" lines.
6a. duplicate the color layer - set the mode to "normal".
6b. add a new layer below - pick out a color from the metal layer, I used #858585 and bucket-fill the entire layer.
6c merge these two layers - call the result "aging".
This will look pretty ugly and it gets worse before it gets better.
6d duplicate the edges layer - invert the color (so it's white) and move it dawn till its above the aging layer.
6e gauss-blur to 5px - duplicate
6f gauss-blur the dupe to 10px - duplicate
6g repeat, to 20px
I usually have to duplicate that last one since it will be pretty faint and you'll want the spread to show up.
The smaller panel areas will now be completely white, but you'll still see some darker color in the middle of the bigger panels. Get the idea?
Merge all these (step 6) layers down to the "aging" layer.
6h make the white areas transparent!
Bingo!
Adjust the mode and opacity of the aging and color layers to taste.
If you remove the paint layer completely, then you get the effect of having paint worn off the edges ... gradually increase opacity of the color layer to get the right amount of wear. I've usually had good results with 75% color and 50% aging both grain-merged against that lmetal layer.
The effect can be quite subtle - I think it is well illustrated by this:
I've seen tutorials which involve hours of work for this effect - OK, a superior version of this effect on ultra-hi-res textures... hopefully this saves some labour.
Simon Bridge
[re2dux] [neolite]
"Everything is perfect down to every last flaw..."
HBT: The Book of Verse - Principia Discordia
[re2dux] [neolite]
"Everything is perfect down to every last flaw..."
HBT: The Book of Verse - Principia Discordia
-
DaddyHoggy

- Intergalactic Spam Assassin

- Posts: 8515
- Joined: Tue Dec 05, 2006 9:43 pm
- Location: Newbury, UK
- Contact:
@Simon B (and indeed Pangloss) - I'm only just starting to realise how powerful/great GIMP is - layers are your friend - I love layers - thanks for the tips - that's going to save me a whole lotta pain!
Oolite Life is now revealed hereSelezen wrote:Apparently I was having a DaddyHoggy moment.
-
JensAyton
- Grand Admiral Emeritus
- Posts: 6657
- Joined: Sat Apr 02, 2005 2:43 pm
- Location: Sweden
- Contact:
It has been said of Photoshop that there are two versions that have been really significant: 1.0, because it was the first, and 3.0, because it introduced layers. Everything since has been tweaks. :-)DaddyHoggy wrote:@Simon B (and indeed Pangloss) - I'm only just starting to realise how powerful/great GIMP is - layers are your friend - I love layers - thanks for the tips - that's going to save me a whole lotta pain!
E-mail: [email protected]
-
Simon B
- ---- E L I T E ----
- Posts: 836
- Joined: Thu Oct 23, 2008 5:54 am
- Location: Red Beach NZ
- Contact:
The curious thing about the GIMP is that it is a GUI front-end for the real powerhouse - Image Magic. That is a CLI-only image manipulator.DaddyHoggy wrote:@Simon B (and indeed Pangloss) - I'm only just starting to realise how powerful/great GIMP is - layers are your friend - I love layers - thanks for the tips - that's going to save me a whole lotta pain!
So, every mouse click has to execute a typed command ... or combination. This should go some way to understanding why it does some things the way it does.
An intreguing tip here too is to use a high-res texture, say 1024x1024, at first - then use your image program to scale it to whatever you end up with (512x512) with the highest interpolation the computer can manage.
Open the model in Wings again, select everything, and the do uv-map > direct ... this will keep the layout but give you an opportunity to create it at the lower res.
Import your new map and apply it.
But if you do that - try to avoid narrow lines ... less than a pixel (forcing antialiasing) will get washed out on the resize. Small details will also have less impact.
OTOH: small mistakes will also vanish ;)
Simon Bridge
[re2dux] [neolite]
"Everything is perfect down to every last flaw..."
HBT: The Book of Verse - Principia Discordia
[re2dux] [neolite]
"Everything is perfect down to every last flaw..."
HBT: The Book of Verse - Principia Discordia
-
DaddyHoggy
- Intergalactic Spam Assassin
- Posts: 8515
- Joined: Tue Dec 05, 2006 9:43 pm
- Location: Newbury, UK
- Contact:
@Simon - I've learned the "use big textures" the hard way - even my Ads for YAH start off as 1024x512 because they scale nicely down to 256x128 - to think when I first started I worked directly on the 256x128 (and it shows in my early ads!)
Cheers (and keep up the good work!)
DH
Cheers (and keep up the good work!)
DH
Oolite Life is now revealed hereSelezen wrote:Apparently I was having a DaddyHoggy moment.
-
Pangloss
- ---- E L I T E ----
- Posts: 303
- Joined: Wed Dec 13, 2006 5:57 pm
- Location: Scranton, PA (via Stevenage, Herts)
Spot on with the "start big" advice. I used people's 512 by 256 YAH work to create a few Ad Rings at 2100 by 256. Made it look great, merged the layers, then reduced to 1050 by 128 (and then trimmed off the ends to make it 1024 by 128).
"All is for the best in this best of all possible worlds..."
Dr.Pangloss, Voltaire's 'Candide'.
Dr.Pangloss, Voltaire's 'Candide'.