Blender 3d Modeling Tutorials

Discussion and information relevant to creating special missions, new ships, skins etc.

Moderators: another_commander, winston

Post Reply
User avatar
Staer9
---- E L I T E ----
---- E L I T E ----
Posts: 570
Joined: Fri Feb 18, 2011 4:53 pm
Location: Hatfield, Hertfordshire (poor industrial)

Blender 3d Modeling Tutorials

Post by Staer9 »

After being around on the BB for a while now I have noticed that there are many people who want to learn how to use Blender, this thread will hopefully fill with tutorials and be the parallel of the Wings 3d thread.

All of my tutorials in this thread use Blender 2.57b so if you have an earlier version you should update it.

To start the ball rolling here is a quick tutorial explaining how to set-up the display for modeling.

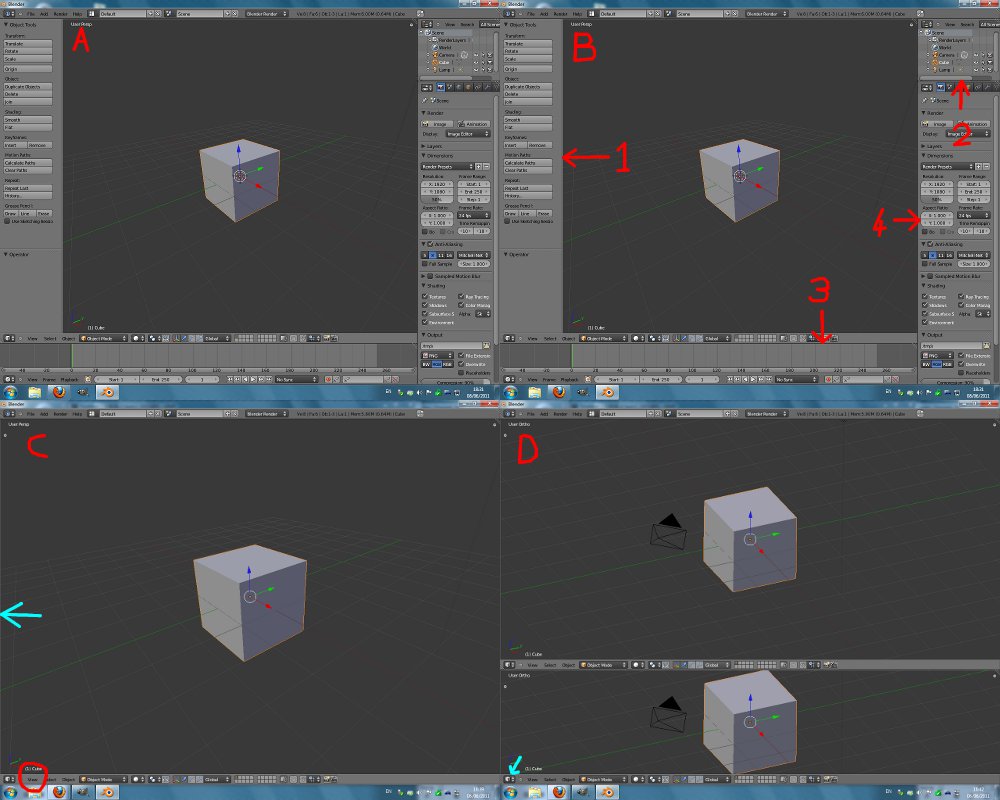
When you first start Blender you will be greated by a screen that should look exactly like 'A', this is not the best set-up for modelling and is better suited to animations (which is not what you want).
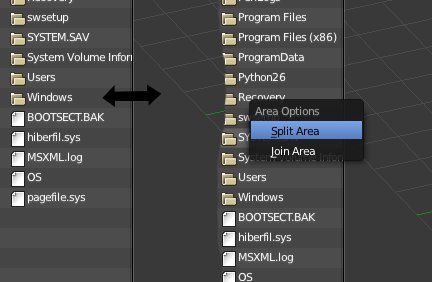
First you need to right click on each of the boarders and select 'Join Area', then click on the sub-window you want to remove.
Do this for all 4 boarders in the order stated in part 'B', when finished you should have something that looks exactly like 'C'.
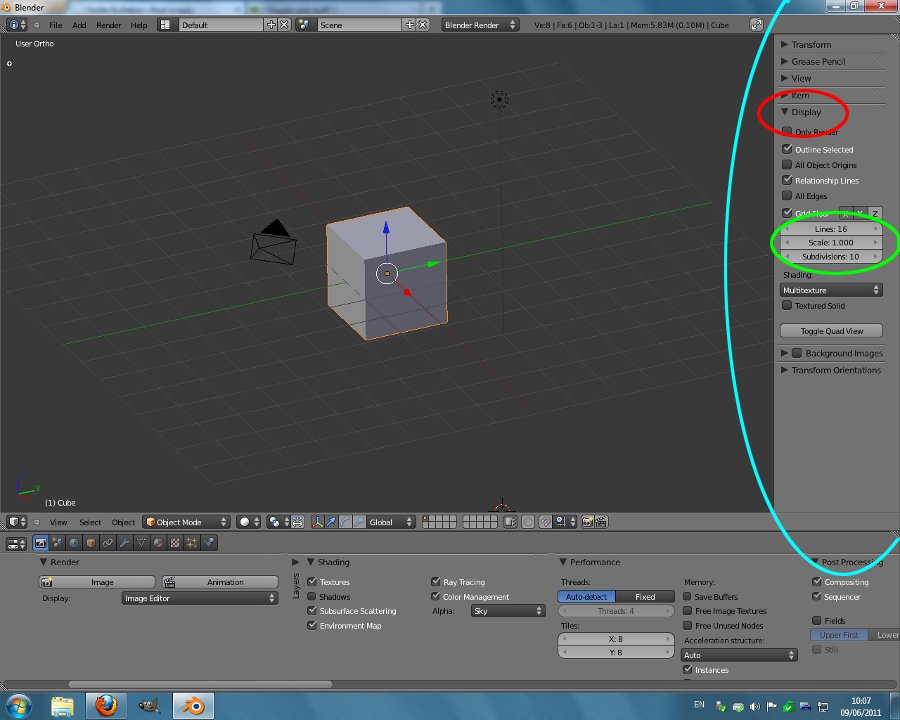
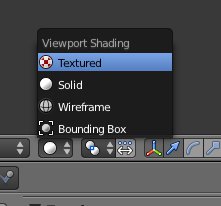
Now, at the moment it is in 'perspective' mode, which is not best suited to modeling and can give a false sense of scale, to change this click the 'veiw' button in the bottom left corner, then click 'Veiw Persp/Ortho'.
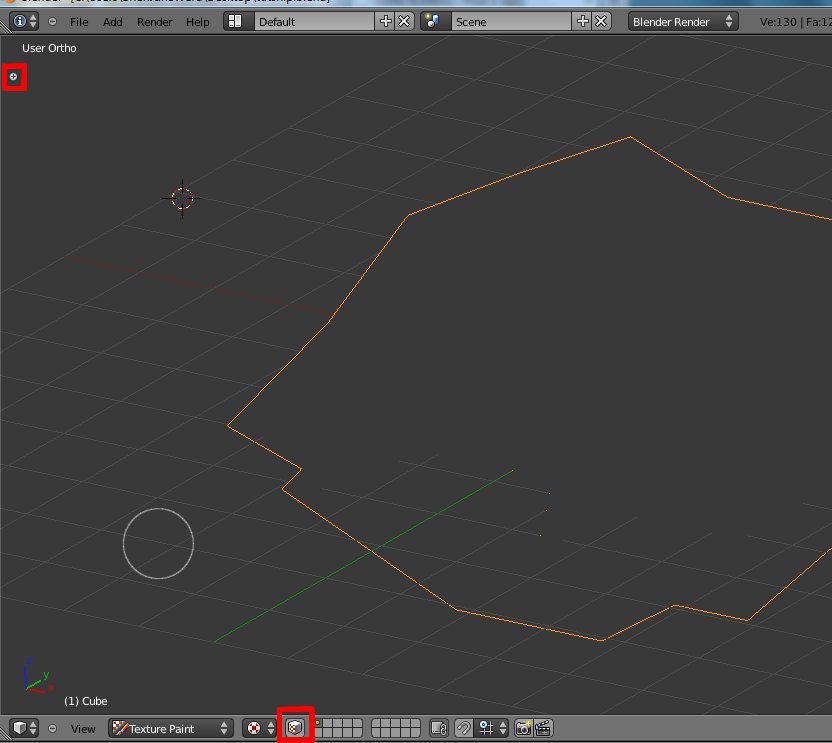
You also need to right click the left (or right) edge (blue arrow) and select 'split area' then click where you want to split it, I would recomend somewhere in the lower third, you should now have something that looks like 'D'.
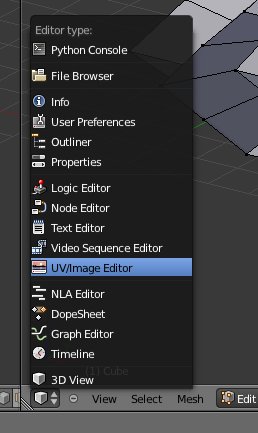
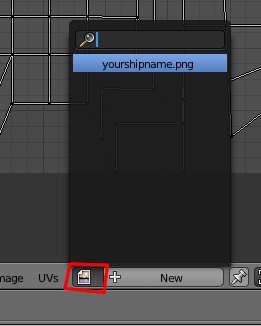
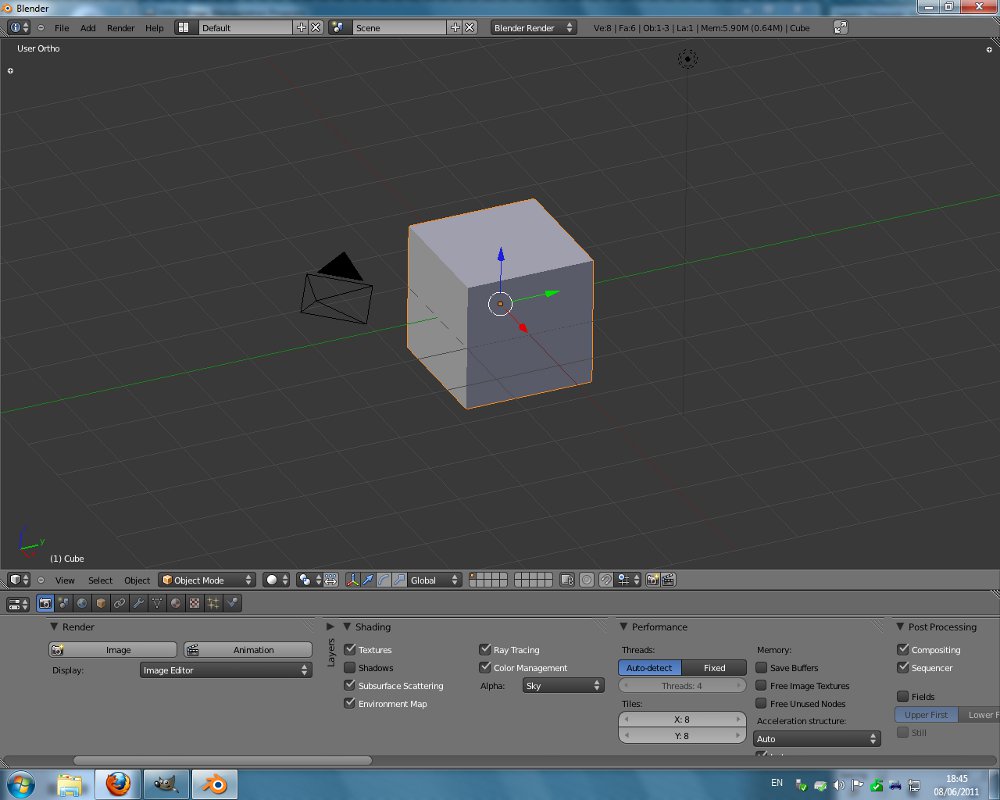
Now click on the menu icon highlighted by the blue arrow, then select 'properties', right click on that area and select 'align-horisontal'.

Image

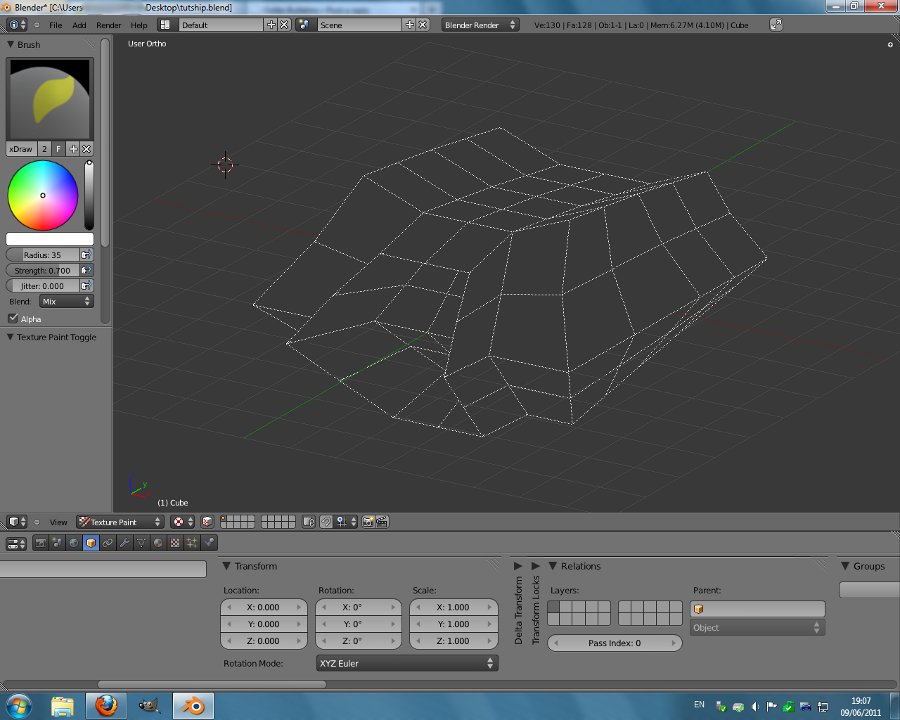
When you have done all this you should have a screen like below, the next step is to click file in the top-left and select 'save user settings', then Blender will remeber your setup and it will stay like it every time you load it up

Image

If you have any Blender tutorials or quetions post them here.
Last edited by Staer9 on Thu Jun 09, 2011 5:22 pm, edited 1 time in total.
Image
User avatar
Svengali
Commander
Commander
Posts: 2370
Joined: Sat Oct 20, 2007 2:52 pm

Re: Blender 3d Modeling Tutorials

Post by Svengali »

I'd think a tutorial section (category) on the WIKI could be a nice addition for new users... .-)
User avatar
Staer9
---- E L I T E ----
---- E L I T E ----
Posts: 570
Joined: Fri Feb 18, 2011 4:53 pm
Location: Hatfield, Hertfordshire (poor industrial)

Re: Blender 3d Modeling Tutorials

Post by Staer9 »

Svengali wrote:
I'd think a tutorial section (category) on the WIKI could be a nice addition for new users... .-)
On a Wiki it is a lot harder to ask questions, and I would have no idea how to set it up either. If someone else wants to post these tutorials to the wiki, feel free.
Image
User avatar
Staer9
---- E L I T E ----
---- E L I T E ----
Posts: 570
Joined: Fri Feb 18, 2011 4:53 pm
Location: Hatfield, Hertfordshire (poor industrial)

Re: Blender 3d Modeling Tutorials

Post by Staer9 »

Now one important aspect: Ship scale.

The first thing you need to know is that the standard grid setup is not large enough, at only 16m by 16m you will be unable to fit a decent sized ship in there.
It is very simple to increase the size of the grid, just press the 'n' key on your keyboard and you will be greeted by an area like the blue one in the screenshot.
Then close all tabs except 'display' (red oval in the screenshot)
In the display tab there will be an adjustable menu, change 1.000 to 10.000 (click it and type 10)
You should now see the size of the grid increase masively.

Image

To see the co-ordinates of a vertex:

Change the mode to 'edit-mode', (1)
Select the vertex (right click), (2)
press 'n', (3)
open the 'transform' tab, (4)
those co-ordinates are the co-ordinates of the sected vertex. (5)

Image
Last edited by Staer9 on Thu Jun 09, 2011 2:50 pm, edited 1 time in total.
Image
User avatar
Staer9
---- E L I T E ----
---- E L I T E ----
Posts: 570
Joined: Fri Feb 18, 2011 4:53 pm
Location: Hatfield, Hertfordshire (poor industrial)

Re: Blender 3d Modeling Tutorials

Post by Staer9 »

Uses Of Different Modes:

In my last tutorial I gave a reference to 'edit mode', this one will fully explore the purpose of blenders modes and which ones are likely to be useful for spaceship modelling.

Object mode: shows all the objects in the scene and is useful for moving them around, however oolite ships do not have more than one object (only model subentities which are actually different files) so this mode is not overly useful.

Edit mode: by far the most useful mode of them all, it is through this that you will make your ships (further explanation on this later).

Sculpt mode: Very useful for making faces, utterly useless for making spaceships.

Vertex paint: I am not quite sure what the point of it is, I have never used it.

Texture paint: By far the best way of creating quick textures, most of my textures were made in Texture paint mode.

Weight paint: Useful for games as it makes parts of the models weigh more than others, however oolite does not support weight paint and does not need to.

Image

You need to know how to access these modes as they will be refered to in future tutorials.
Image
User avatar
Staer9
---- E L I T E ----
---- E L I T E ----
Posts: 570
Joined: Fri Feb 18, 2011 4:53 pm
Location: Hatfield, Hertfordshire (poor industrial)

Re: Blender 3d Modeling Tutorials

Post by Staer9 »

Basic modeling tutorial:

This tutorial will teach you the basics of modeling.

First you need open a new file, you will be greeted by the cube, a camera and a lamp.
Delete the camera and lamp, they are unneccessary (right-click to select and press the delete key)
Select the cube and select edit mode, now scale it up so it takes up a nice proportion of the grid (you need to have scaled the grid to 10 from the 'Ship Scale' tutorial)
To scale it up simply press 's' and move the mouse away or towards to scale, left click when it is the size you want.
Now, 8 vertexes is not enough to make a decent model, so what you need to do is press 'a' until all of them are selected, then press 'w' and click 'subdivide'.
You should now have something that looks like the third image.
Now creativity comes in, select individual vertexes (right click) or select multiple ones (hold shift and right click) and move then around using the three arrows.
Keep doing this until you have a shape you like, I ended up with the shape from the forth image, if yours doesn't look like that it doesn't matter.
Now you can either choose to leave it like that or you continue to work on it, you may need to subdivide it again.

Image

Another useful way of changing it's shape is by selecting some faces (select the vertexes around it and it will automatically select the face) and pressing 'e', it will extrude those faces.
Extruding is my favourate way of making my models, the image below is the result of a few more minutes work on the model, and a lot of extrusion.

Image
Image
User avatar
Rxke
Retired Assassin
Retired Assassin
Posts: 1757
Joined: Thu Aug 12, 2004 4:54 pm
Location: Belgium

Re: Blender 3d Modeling Tutorials

Post by Rxke »

Give this man a (virtual) beer! :D


I'm always sooooo pleasantly surprised when I see somebody 'give back to the Oommunity'
User avatar
Staer9
---- E L I T E ----
---- E L I T E ----
Posts: 570
Joined: Fri Feb 18, 2011 4:53 pm
Location: Hatfield, Hertfordshire (poor industrial)

Re: Blender 3d Modeling Tutorials

Post by Staer9 »

Texturing using the 'Texture paint' mode:

This tutorial will teach you how you use the 'Texture paint' mode, it is much quicker than making a texture in Gimp/Photoshop but generally will not give such a good result.

First open up your model (if you don't have one you can download mine from the last tutorial here)

First split the edit window in half (spliting and joining areas explained in the first tutorial)
now set the window mode to 'UV/image editor'
Image
you should have an area that looks like this:
Image
now click 'image' > 'new image', call it whatever but make sure you add the .png suffix to the end or it will think it is a jpg, keep the rest of the settings the same, but change the colour to a dark grey.
Image
The next step is to set it to set the other area to edit mode.
Now select all the vertexes (you can do this by pressing 'a').
You will need to unwrap your texture, you can do it manually but it will take you ages, it is much easier to go 'mesh' > 'UV Unwrap' > 'Smart UV project' (like below).
Image
you should now see bits of your model in the image window, but you now need to link those bits to you image, so click the image icon and select your texture
Image
You can close the image window if you want.

Now to start texturing it, set 'viewport shading' to textured, you should notice your model go the dark grey colour
Image
set mode to texture paint, the lines on your model should disapear, if you want them back click the icon highlighted below, you also need to click the (+) symbol in the top right corner for texture paint options
Image
your screen should now look like this:
Image
Now it is completely up to you what you do, play around with the menu to change opacity and colour and just draw straight onto the model, please post your finished creations to the 'Show and Tell' thread.

N.B.
In the texture window you should click "image > pack image" this means that the texture is saved in the .blend file (of course when you export it as an obj you also have to export the texture)
Last edited by Staer9 on Thu Sep 22, 2011 11:10 am, edited 1 time in total.
Image
User avatar
Staer9
---- E L I T E ----
---- E L I T E ----
Posts: 570
Joined: Fri Feb 18, 2011 4:53 pm
Location: Hatfield, Hertfordshire (poor industrial)

Re: Blender 3d Modeling Tutorials

Post by Staer9 »

Further explanations of menus and buttons:

So far you will have used 3 of the 16 Editor types, these are probably the only three you will ever use.
The 3d veiw is used for editing your model
The UV/image editor is used for texture mapping and editing
The Properties is used for changing properties (quite obvious)
All the rest serve no purpose unless you plan on making games or animations
Image
These editor modes can be changed by clicking on the icon in the top/bottom left.

If you want to see the polygon count of your current model it is displayed nicely in the top left, to make a ship that runs smoothly it is good to aim below 1000 polygons, most systems can run up to 2000 polys, even this computer that has no extra grafics card can run my Batship which has 7000 polygons.
Image
Ve = vertexes
Fa = faces (or polygons)
Ob = objects
La = not sure....

In the top left corner of the properties area there are 11 buttons, again only a few actually have a purpose in ship building, those are the highlighted ones, which are called: 'Object, Object constraints, Modifiers and Object data' in that order from left to right.
Image
Object = shows basic object settings, DON'T CHANGE THEM.
Constraints = Very intricate settings that can be used to vastly improve the appearence of your model (more in-depth tutorial later)
Modifiers = hugely useful settings that require less experiance to use (more in-depth tutorial later)
Object data = not very useful but still has some purpose.
Image
User avatar
Staer9
---- E L I T E ----
---- E L I T E ----
Posts: 570
Joined: Fri Feb 18, 2011 4:53 pm
Location: Hatfield, Hertfordshire (poor industrial)

Re: Blender 3d Modeling Tutorials

Post by Staer9 »

The 'W' menu:

This has been used allready when you subdivided your models in the simple modeling tutorial, this one will explore it in more depth.

Image

First we have 'subdivide' it divides all selected edges and faces by 2
'subdivide smooth' divides all edges and faces, but also smoothens them
'merge...' useful for joining vertexes, just select the ones you want to join and 'merge' them
'remove doubles' has the same function as merge by joining duplicate vertexes, very useful as a finishing touch to lower the polygon count
'hide' useless
'reveal' just as useless
'select inverse' the uselessness continues...
'flip normals' this is a specialist tool, very usefull when you know what to do with it (more on that later)
'smooth' helps remove hard edges, usefull if you are making a smooth ship
'shade smooth' does not change the position of anything, but shows you what your model would look like if set to 'smooth' in shipdata
'shade flat' does the oposite

The final three have no purpose in ship modeling
Image
User avatar
Mauiby de Fug
---- E L I T E ----
---- E L I T E ----
Posts: 847
Joined: Tue Sep 07, 2010 2:23 pm

Re: Blender 3d Modeling Tutorials

Post by Mauiby de Fug »

I have to say, cheers for these! I haven't used them yet, but I may well do at some point in the future! The few times I've bothered booting up Blender, I've been so confused and have not been able to work out how to do anything. Googling was never much help, whereas these instructions provide information on what will actually be useful and relevant. They could tempt me to actually get on with trying out ship building again...
User avatar
maaarcooose
---- E L I T E ----
---- E L I T E ----
Posts: 397
Joined: Sun May 29, 2011 9:36 pm
Location: Devon, UK
Contact:

Re: Blender 3d Modeling Tutorials

Post by maaarcooose »

Brilliant blender tutorial. Made so by the fact that it doesn't start with the lines "Blenders interface is a little unusual so..." or "Blender can do lots of stuff. Let me take you through the entire interface before we start..."

Perfect approach.
You want to do this. Here's how. BTW the layout is rubbish, lets set it up nice first in simple steps.

Thank you.....

!m!
Trading computers and writing stuff....
Website: http://www.theramist.co.uk/
OOliteInfo: http://www.theramist.co.uk/ooliteinfo/oo.php
User avatar
mandoman
---- E L I T E ----
---- E L I T E ----
Posts: 1375
Joined: Thu Apr 28, 2011 3:17 pm

Re: Blender 3d Modeling Tutorials

Post by mandoman »

Staer9 wrote:
Svengali wrote:
I'd think a tutorial section (category) on the WIKI could be a nice addition for new users... .-)
On a Wiki it is a lot harder to ask questions, and I would have no idea how to set it up either. If someone else wants to post these tutorials to the wiki, feel free.
Exactly! Right off I have a question. I downloaded Blender 2.57b and extracted it. On opening, the first thing I see is a Window very similar to what you show in A, but not exactly like it. On top of that window is a smaller window with what looks like a chameleon in it. That went away when I left clicked on the main window. Here is the main window I got when I first opened Blender 2.57b:
Image

Next thing is that when I right click on the borders, I don't even get a drop down menu, so I can't get to the "Join Area" command. What am I doing wrong. I'm obviously missing something. :oops:
Mandotech Industries Wiki Page.

http://wiki.alioth.net/index.php/User:Mandoman
User avatar
Staer9
---- E L I T E ----
---- E L I T E ----
Posts: 570
Joined: Fri Feb 18, 2011 4:53 pm
Location: Hatfield, Hertfordshire (poor industrial)

Re: Blender 3d Modeling Tutorials

Post by Staer9 »

mandoman wrote:
Right off I have a question. I downloaded Blender 2.57b and extracted it. On opening, the first thing I see is a Window very similar to what you show in A, but not exactly like it. On top of that window is a smaller window with what looks like a chameleon in it. That went away when I left clicked on the main window.
The chameleon thing is perfectly normal, it will appear every time you start blender and you did exactly the right thing to remove it: click somewhere in the main window.
mandoman wrote:
Next thing is that when I right click on the borders, I don't even get a drop down menu, so I can't get to the "Join Area" command. What am I doing wrong. I'm obviously missing something. :oops:
first of all are you absolutely sure you were clicking on the boarders, (this may sound silly but some things that look like boarders are not.
You will know it is a boarder when your mouse icon turns into the drag icon: <-> (bad representation)
Image
when right clicking the shown menu should appear (make sure you join the boarders in the order stated in the top post or the menu will not show)
if you are still having trouble I'll post a video tutorial
Image
User avatar
mandoman
---- E L I T E ----
---- E L I T E ----
Posts: 1375
Joined: Thu Apr 28, 2011 3:17 pm

Re: Blender 3d Modeling Tutorials

Post by mandoman »

Staer9 wrote:
first of all are you absolutely sure you were clicking on the boarders, (this may sound silly but some things that look like boarders are not.
You will know it is a boarder when your mouse icon turns into the drag icon: <-> (bad representation)
Image
when right clicking the shown menu should appear (make sure you join the boarders in the order stated in the top post or the menu will not show)
You are correct, I wasn't clicking on the correct spot. I seem to be on track now, but I'll be back. :D
Mandotech Industries Wiki Page.

http://wiki.alioth.net/index.php/User:Mandoman
Post Reply